


[This blog was originally posted on Feb 22, 2022 and has been updated to showcase new examples]
Email marketers, here’s a question for you- at the end of the day, when you spend countless hours conferring with your copywriters, designers, and developers to craft the perfect email marketing campaign, what is the bare minimum that you expect of it? That it at least breaks into your customers’ inboxes, right? Well, we are here to tell you that it’s not as straightforward as it might seem. In order to compete with the thousands of other businesses also vying for your customer’s attention, you first need to be in the fray. What can prevent that? You getting blacklisted.
Although there’s no official study to back it (yet), we are pretty sure that most email marketers’ nightmares comprise being marked as spam or listed on a blacklist. Besides sucking the life out of your hard work, getting blacklisted deals a body blow to your brand reputation too. So, how do you escape this fate? By getting subscribers to whitelist your email address. Today, we’ll be taking a deep dive into email whitelisting, acquainting you with everything you need to know about it!
Table of Contents:
Understanding The Email Blacklist
Email blacklist is a real-time list or database that contains all domains and IP addresses that have a reputation for sending spam. Simply put, it functions as a filter, determining which emails can reach their designated inboxes and which not. ISPs (Internet Service Providers), anti-spam vendors, and other similar organisations make use of this list to keep spam at bay. As terrifying as it is to be identified on a blacklist, one also has to admit that they are incredibly useful. Of the massive volume of emails that are exchanged daily, approximately 85% of it is considered spam. Thanks to blacklists, these unwanted messages are kept from flooding subscribers’ inboxes.
So, which are the companies that compile these valuable blacklists? Let’s take a look.
- Spamhaus: Among the leading names in this field, Spamhaus’ multiple lists- SBL Spamhaus Block List, DBL Domain Block List, XBL Exploits Block List, and PBL Policy Block List- are used extensively by ISPs and organizations across the globe. The entries in Spamhaus lists consist of spam trap addresses and the IPs and known addresses of spammers. Many purchased lists contain the spam tram addresses that are identified by Spamhaus.
- Invalument: Invalument maintains three blacklists- ivmSIP, ivmURI, and ivmSIP/24. Each of these lists tracks different information.
- Spamcop: Spamcop makes their lists by taking stock of spam reports and spamtrap addresses. Additionally, they follow a system wherein points are assigned to email addresses on the basis of spam complaints before they are added to the lists.
- Barracuda: Email addresses that spam companies selling data, email security hardware, and online software contribute majorly to Barracuda lists.
Although there are many other companies in the picture, too, the lists provided by these four vendors are the ones that are primarily used by businesses out there. As an email marketer thus, your aim should be to avoid making an appearance here at all costs.


Reasons That Could Get You Blacklisted
The definition of spam is subjective and can vary a lot from one ISP or blacklist vendor to another. Different blacklists adhere to separate policies and rules to identify spam. Below, we have listed some of the most common reasons for getting blacklisted.
- Fraudulent activity: This is one of the primary reasons that lead to an email address getting blacklisted. Hackers and cyber attackers either take illicit control of or spoof verified email addresses to conduct a host of fraudulent activities, including phishing, malware, hacking, ransomware, and the like. Subsequently, this earns these addresses a position on blacklists.
- Subscriber complaints: A lot of the time, you get blacklisted because your recipients mark your emails as spam. Higher the count of spam complaints against you, greater is the probability of your IP being identified on a blacklist.
- Email list malpractices: Often, in the quest of expanding their reach and visibility, some businesses fall prey to the temptation of buying email lists, a practice that is strongly frowned upon within the email community. The contacts on such lists have either not heard of your business or consented to receive your communications. So, when you send them an email, it is obvious that they’ll be inclined to click the spam button. Simply put, buying email lists doesn’t fetch you more customers but more spam complaints. All of this eventually leads to you getting blacklisted.
- Spam trap penalties: Produced and maintained by major email ISPs (Gmail, AOL, Yahoo) and the DNSBL (Domain Name System-based blackhole list), spam traps are bot emails that are deployed to lay hold of spammers. Since they aren’t present on public platforms such as websites, they don’t pose any threat to legitimate email senders. They are hidden alongside defunct or fraudulent email addresses that are harvested by spammers who make email lists out of them. When marketers buy these lists and attempt to reach out to the leads on them, their emails inevitably hit the spam trap addresses. Following this, the sender instantly gets flagged and added to a blacklist. The best way to identify spam traps is to track the email engagement of your sent emails. Because they are bots, these email addresses will register no interaction with your messages. There are four kinds of spam traps distributed across the internet- Classic spam traps, Typo domain-based spam traps, Seeded spam traps, and Recycled email address-based spam traps.
- Inorganic email list growth: You can’t build a high-quality email list overnight; it is a gradual process. If your list happens to grow by an exponential margin within a short time span, there can only be two explanations behind it- a miracle or a purchased list. More often than not, it is the latter. Inorganic surges in the list size can earn you the suspicion of ISPs and ESPs (Email Service Providers) alike, eventually pushing them to blacklist you.
- Mass email sending: One of the many reasons why the batch and blast email technique has gone out of vogue is the high number of spam complaints that it invites. When you send the same email to a large group of people, it goes without saying that it won’t resonate with everyone. And the disgruntled ones have got nothing to lose by flagging you as spam. Forget the recipients, just the act of sending an irrationally high volume of emails is enough to attract the roving eye of ESPs. It’s not suspicious when your email list has genuinely grown over time, and you have gone from sending, say, 100 emails to 1000 emails within 4-5 months. However, if someone sends a dozen emails today, 5000 the following day, and 50,000 the day after, something’s definitely fishy.
- Unmaintained email lists: An unhygienic email list is one of the main culprits behind you getting blacklisted. Not spending enough time cleaning your email list means you risk harboring uninterested, dormant, or inactive subscribers. Sending emails regularly to such contacts severely affects your sender reputation. Maintaining the hygiene of your email list, thus, is imperative to improving your email deliverability.
- Poor email content: Your email content also plays a significant role in determining whether you get blacklisted or not. Most ISPs reject emails whose text is in all caps and overly punctuated. Additionally, the presence of unnecessarily colored fonts and excessive visuals are considered to be potential red flags as well. In some cases, too many spelling errors can also cause the readers to question the sender’s credibility.

What Should Your Response Be To Getting Blacklisted?
Nobody wants to be blacklisted, of course, but given the abundance of blacklists out there, there’s a very good chance that you will inevitably find your IP address on a list at one point or the other. The top ISPs use the lists created by the principal blacklist vendors mentioned above. So, if you don’t feature on any of those, you actually don’t have much to worry about. Being identified by smaller blacklists won’t hamper your reach and visibility all that much. In fact, give it a few weeks, and your address might just drop off altogether.
On some occasions, a mistake as trivial as misspelling your recipient’s email address can get you blacklisted. You can resolve this by requesting blacklist removal. In other instances, however, getting blacklisted is a definite indicator of a chink in your email marketing armor. Hence, it is important that you try to get right underneath the matter the moment you get notified. Try and analyze what could have possibly gone wrong. Is it something you wrote in your email? Or does the problem lie with your email list? Therefore, in many ways, getting blacklisted alerts you to serious flaws in your email marketing strategy and presents you with an opportunity to fix them.
Getting flagged by a major blacklist vendor is not an irreversible process; you are allowed to request a removal. If it’s a personal IP address, all you have to do is visit their websites and learn everything relevant to the removal process. In most cases, it’s a fairly straightforward affair as long as you pay heed to what they say regarding cleaning up your lists and emails. If you’re mailing via ESPs, they will voluntarily instruct you on what you need to do to rectify the issue. That’s not all; they will also get in touch with the blacklist companies to have their IP addresses dropped off. The bottom line is, getting blacklisted is not the end of the world, so long you play your cards right.
What is Email Whitelisting?
As you might have guessed from the name already, email whitelist is the exact opposite of a blacklist- a database of all the approved email addresses, names, and contact numbers allowed to be delivered to customers’ inboxes. When your recipients add your email address to their whitelist, they essentially inform your email client that they trust you. As a result, your emails make their way smoothly into their inboxes without being parsed by any spam filters. From a subscriber’s point of view, when you whitelist a particular address, you ensure that you never miss any emails from them. Hence, email whitelisting is beneficial for email marketers and subscribers alike.
Why Should You Ask Your Subscribers To Whitelist You?
If you truly want your email campaigns to reap their desired dividends, you must urge your customers to whitelist you. The following reasons will surely give you more of an incentive.
- Getting whitelisted reduces the chances of your emails getting wrongly flagged as spam, or junk mail, doing a whole world of good for your email deliverability in the process.
- It guarantees that your emails will definitely land in your subscribers’ inboxes. Subsequently, the number of people interacting with your campaign will go up, ultimately paving the path for improved results.
- Occasionally, subscribers miss important communication from their favorite brands simply because they haven’t added them to their whitelist. Whitelisting helps them prevent this.
The moral of the story is you should never pass up an opportunity to encourage your recipients to whitelist you- be it in your welcome emails, as a concluding thought in your promotional emails, or even through a separate dedicated email sequence.
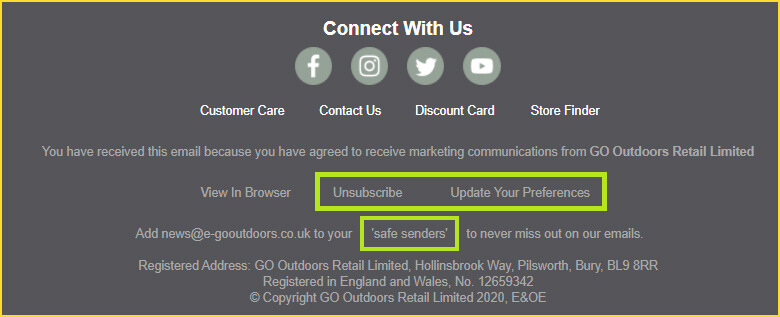
If you’re wondering how to go about it, take a look at this email from Go Outdoors.

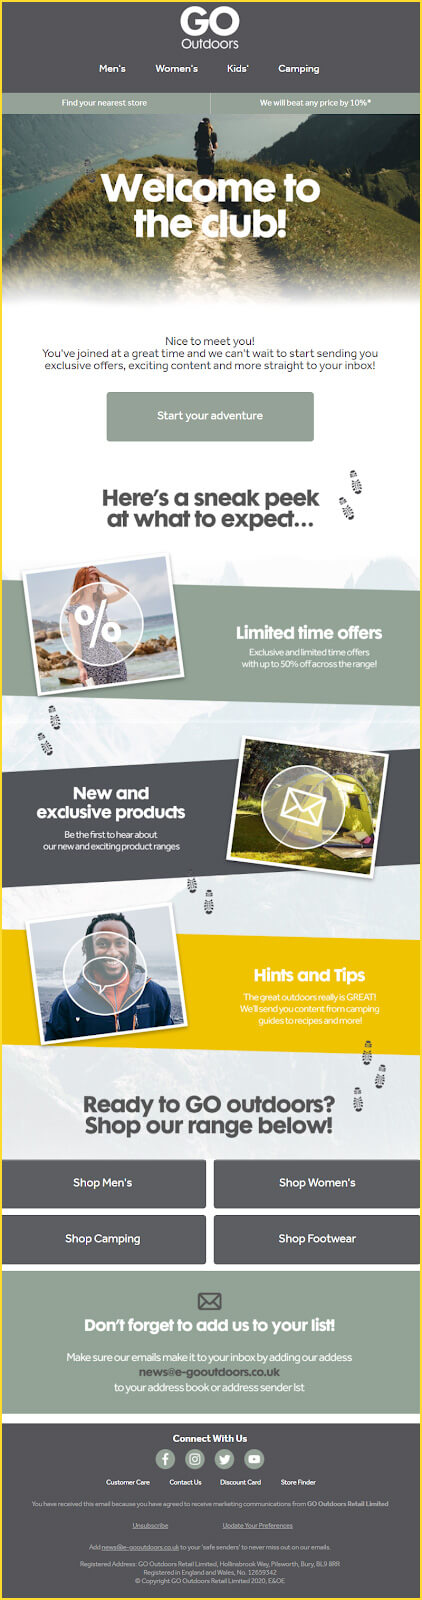
This welcome email from Go Outdoors includes a prominent reminder for their readers to whitelist them. But, this is not the only instance where they do so. Their future emails carry this message as well, albeit not as loudly. Here’s how it looks.

Here’s another example from Under Armour.


Whitelisting an Email in Gmail
When you whitelist a sender in Gmail, you’ll receive their emails in the “Primary” tab rather than the “Promotions” tab. Additionally, there will be no risk of any of their future communications going into the spam folder either. The following steps illustrate how to whitelist emails in Gmail.
In Desktop:
- When you open your Gmail inbox on your desktop, you’ll notice a gear icon in the top right corner of your screen. This is the settings button. Click it. Either a “Quick settings” menu or a drop-down menu will appear on your screen. In the case of the former, you have to click the “Select all settings” button. And in the case of the latter, you need to click the “Settings” option.
- This will lead you to the expanded settings window. Here, you need to navigate to the “Filters and Blocked Addresses” tab. You should be able to locate it in the top menu. Click it.
- You’ll enter the expanded area of this tab. Here, you’ll find information regarding your existing filters. Remember, whitelisting a sender in Gmail requires you to create a new filter. So, you need to select the “Create a new filter” option in this space.
- Upon doing this, a dialog box will appear on your screen. In the “From” field, you can either whitelist a specific sender by entering their email address or all the communication from a particular business by specifying their domain name. Suppose the name of the domain is uplers.com, then your entry should look something like- “@uplers.com”
- Once you have entered the address or the domain, you’ll notice the “Create filter” button at the bottom of the dialog box coming to life.
- When you click it, another window will appear on your screen. Here you’ll see multiple checkboxes such as “Mark as read,” “Star it,” “Forward it,” “Never send it to spam,” “Always mark it as important,” and many others. Tick the “Never send it to spam” box. This will make sure that none of the emails coming from the address or domain you specified in the previous step end up in your spam folder or the bin.
- After selecting that checkbox, click the “Create filter” button at the bottom right of the window to conclude the process.
- If you simply want to move a sender from the “Promotions” to the “Primary” tab, you can do so with the help of a simple drag-and-drop maneuver- pick up the message from the “Promotions” tab and drop it off in “Primary .”As soon as you finish the action, a message will flash on your screen, asking you whether you want to do this for all future messages of this sender. Click “Yes.”
In Gmail Mobile App:
- Launch the application and go to the Junk or Spam folder.
- Tap to open the email which you think has accidentally landed in there.
- You’ll see a “Why is this message in spam?” dialog box at the top of the email. At the bottom of the dialog box, there will be a “Report not spam” button.
- Tap on that button; now, all future emails from this sender will be delivered directly to your inbox.
Whitelisting an Email in Outlook
In order to whitelist a sender in Microsoft Outlook, the recipient has to add their address to the safe senders lists. This will ensure that messages from the said sender are not scrutinized by spam filters and delivered without fail to their inboxes. The steps given below explain how to whitelist emails in Outlook.
In Desktop:
- Sign in to Outlook’s web version and click the settings button in the top-right corner (the gear icon).
- Upon clicking, a drop-down menu will appear on your screen. Click the very last option on this menu- “View all Outlook settings .”This will lead you to the expanded Settings page.
- Here, you’ll see a host of different options like “General,” “Mail,” “Calendar,” and “People .”Click “Mail.”
- This will open up another sub-menu. Here, you have to click the “Junk email” option.
- Now the “Junk email” window will appear on your screen. You will notice two options- “Safe senders and domains” and “Safe mailing lists .”Under both of these options, you’ll find an “Add” button.
- Click this button and enter the email address or the domains you wish to whitelist. Once you’ve specified your preferences, click the “Save” button at the top. From this point onwards, any email that fails to align with these preferences will find itself heading towards Outlook’s email junk folder.
- An alternative method of whitelisting a personal email address involves adding it to your Outlook Contacts.
In Outlook Mobile App:
- Open the app and tap to open the email whose sender you wish to whitelist.
- At the top right corner of the app screen, you’ll notice three dots. Tap on them.
- From among the options that appear, select “Move to focused inbox.”
- A pop-up screen will appear on your screen. Here, you have to tap on “Move this and all future messages” to wrap up the process.
Whitelisting an Email in Apple Mail
If you are wondering how to whitelist an email sender in Apple Mail on OS X or iOS devices, you have to carry out the following steps:
- In the top menu of the Apple Mail Window, there’s a “Mail” option. Click it. A drop-down menu will appear. From among the several options, select “Preferences .”The keyboard shortcut for accomplishing this task is “Command” +”,”.
- In the “Preferences” window, select the “Rules” tab. Next, click the “Add Rule” button.
- A dialog box will appear on your screen. In the “Description” field, you have to specify the name of the rule you are going to define.
- Go to the next field. You will see a drop-down list over here. Click it, and select “any .”Now, this field will read something like: “If any of the following conditions are met.”
- In the following field, you’ll encounter two more drop-down lists. Out of the options offered by the first list, choose “From .”From the second, click “Ends with.”
- Adjacent to the second drop-down list (which has now been set to “Ends with”), you should be able to see a text field. Here, you have to enter the name of the domain you wish to whitelist. If you want to add another domain name, click the plus sign in the next field.
- Next, go to the “Perform the following actions” section. Under this section, you’ll see two drop-down lists. Set the first one to “Move Message” and the second one to “Inbox.”
- Once you are done, click the “OK” button to save your rule and exit the window.
While setting your rules in Apple Mail, you need to be extremely mindful of the order you specify. Keep in mind that Apple Mail executes your rules in chronological order. There can be a scenario where a certain message might satisfy the criteria specified for more than one rule. At the end of the day, you want your rules to apply to the incoming emails in the correct logical order.
Whitelisting an Email in Yahoo Mail
The following steps explain how to whitelist an email in Yahoo Mail.
In Desktop:
- In the Yahoo Mail window, navigate to the settings option and click it. Select “More Settings” from the options that appear.
- This will bring you to the expanded “More Settings” Page. Here, you’ll find multiple options (Personalize inbox, Mailboxes, Notifications, etc.) on the extreme left. Choose “Filters”.
- In the “Filters” window, you will spot the “Add filters” option. Click it and enter the sender address or the domain name you want to whitelist.
- Besides specifying sender addresses and domain names, you can also enter any other text string that you expect to be present in the body of your future emails.
The above set of actions is to be carried out for a sender who hasn’t yet sent you an email. Senders who have communicated with you in the past can be whitelisted by highlighting their message in the “Bulk” folder and marking them as “Not Spam .”As soon as you approve the first message of a particular sender, none of their future emails will be rejected by Yahoo Mail spam filters.
In Yahoo Mail Mobile App:
- Launch the app and tap on the sidebar.
- Navigate to the spam folder and open the message you want to whitelist.
- Tap on “Move” and then on “Inbox.”
Whitelisting an Email Address in AOL
Most AOL email users are in the dark about whitelisting because this email client lacks a conventional email whitelist. AOL prioritizes emails from senders listed in the user’s address book. Hence, adding an email address to your address book is essentially the AOL version of whitelisting someone. Here’s how you can go about it.
- Login to your AOL account.
- Look for the “Contacts” option in the left navigation pane. Select it.
- Next, click the “New Contact” icon. Enter the email address or the domain name you want to whitelist.
- At the bottom of the window, you will observe a “Add Contact” button. Click it to conclude the process.
In AOL, the process of deleting existing contacts is just as easy as adding new ones. All you have to do is choose the contact and click the “Delete” button (located at the top of the page).
Whitelisting an Email Address in ProtonMail
Developed by scientists at the CERN research facility, ProtonMail is a secure email provider that employs end-to-end encryption to shield its users from hackers, spammers, and other unauthorized third parties. ProtonMail comprises an inbuilt smart spam detection system that is proficient in automatic email filtering. However, despite its high accuracy, it can direct a genuine and relevant email towards the spam folder every now and then. Hence, it is important for users to know how to whitelist senders in ProtonMail. Below, we have listed the steps for the same.
- Login to your ProtonMail account and navigate to Settings.
- Select it and in the expanded window that appears, click the tab that reads “Filters.”
- Next, navigate to the Whitelist section. Here, you need to click the “Add New Filter” option.
- Enter the email address or the domain name you wish to whitelist.
- Click the Save button to finish the process.
Email Whitelisting Best Practices
Now that you know how to whitelist email addresses across the most popular email clients in the market let us walk you through some whitelisting best practices that will let you stay ahead of the curve.
- Don’t think twice before requesting your users to whitelist you: Starting off this list with a common, yet extremely important tip. Your customers receive a barrage of emails from several sources on a daily basis. Now, even if they have opted in for your newsletters and communications, you can’t blame them if they don’t remember the same. After all, it’s a tough task to keep track of all the brands one subscribes to. The problem is, if the user can’t recall signing up for your emails, your messages will appear unsolicited to them. And then, their natural response will be to either delete your email or, worse, flag you as spam. Hence, you must regularly ask your subscribers to add you to their address books or safe senders list.
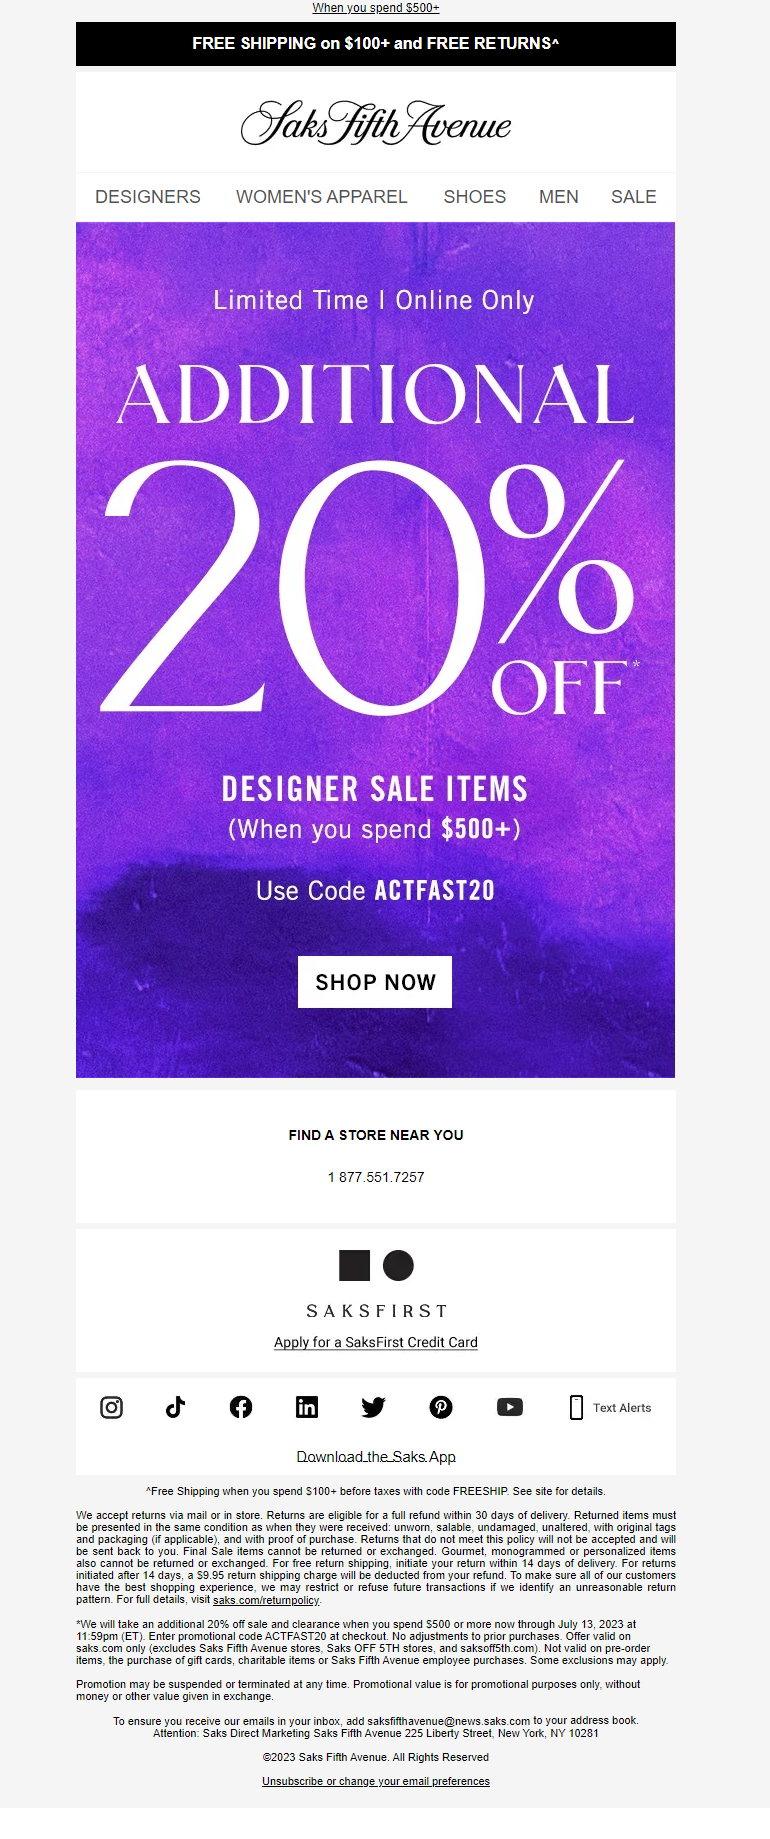
In the following email from Saks Fifth Avenue, they have included their request to be whitelisted in the footer section.

- Improve your value proposition: Your subscribers will never whitelist you until you give them a compelling enough reason to do so. Whenever someone signs up for a newsletter, their main objective is to enrich their knowledge. A study conducted by Disqus suggests that nearly 72% of users subscribe to a newsletter with the aim of either finding out more about a new topic or staying up-to-date on the latest content from a certain website. Goes without saying if your communications aren’t providing enough value to your readers, they’ll gradually stop engaging with you. Therefore, it is highly essential to populate your newsletter with top-notch content. Doing so not will not only increase the probability of you getting whitelisted but also amplify your conversions and sales in the long run. How? Newsletters don’t contribute to sales in and of themselves, but what they do is establish you as a figure of authority. And while making purchases, customers invariably gravitate towards brands with greater clout in the market.
- Segment your email list: Very few things appeal more to customers than personalized emails. To get your personalization on point, it is important you practice email list segmentation. Segmenting your list involves dividing your customers into different sections based on various parameters such as age, gender, occupation, location, likes and preferences, past purchases, browsing history, and position in the sales funnel. Subsequently, this enables you to understand the needs and requirements of the diverse buyer personas to interact with you, providing you with enough fodder to write unique and personalized emails for every individual section. Now, because your messages are highly relevant to your readers, they start looking forward to your communications and will be motivated to whitelist you.
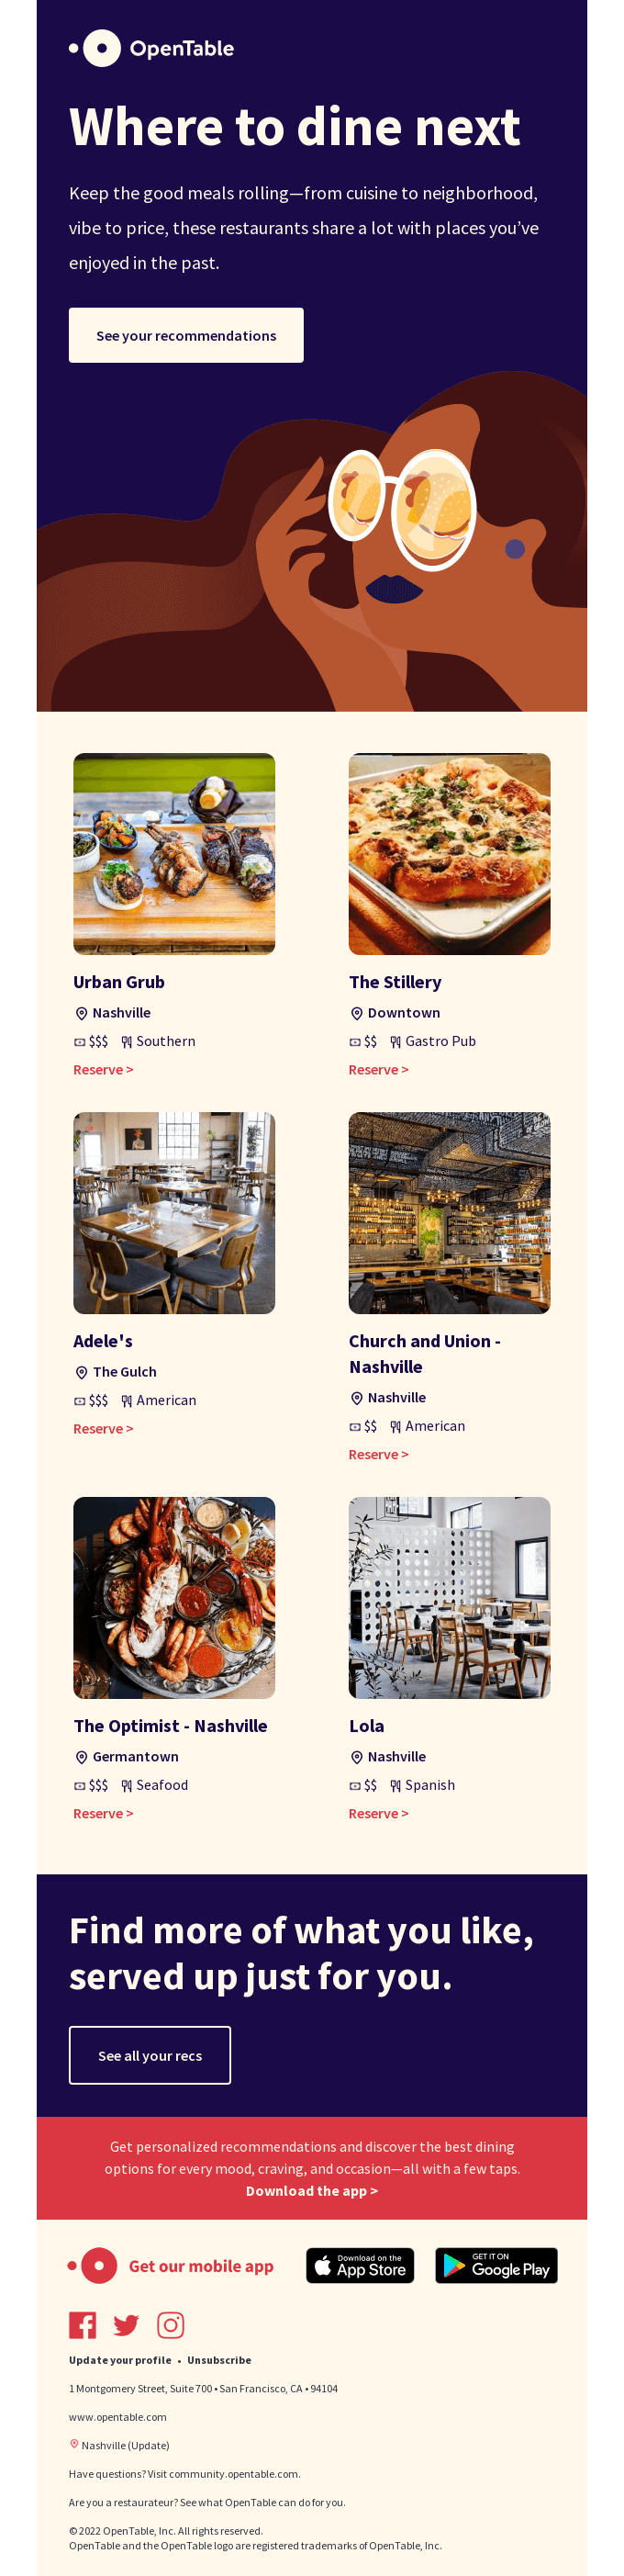
For instance, take this example from OpenTable, that shares personalized restaurant recommendations with its recipient. Who wouldn’t want to whitelist these emails?

- Allow your users to unsubscribe: Although it might sound counterproductive at first, giving your customers the option of unsubscribing from your emails and newsletter actually goes a long way towards strengthening your relationship. Additionally, it helps you improve the quality of your email lists. At first, when someone starts expressing a reduced interest in your emails, try and analyze all the possible reasons that might have caused them to disengage. But if the problem persists despite you revamping your strategies, then it’s perhaps time to let go. Ask any email marketer, and they’d tell you that they would instead prefer engaging with a small list of highly engaged customers rather than an extensive list of uninterested ones. However, before your customers unsubscribe, make sure you ask them what made them do so. This can provide you with valuable insights to improve your existing plan of action. Along with the unsubscribe link, give an update preferences link to your customers; let them specify the frequency with which they want your emails in their inboxes.
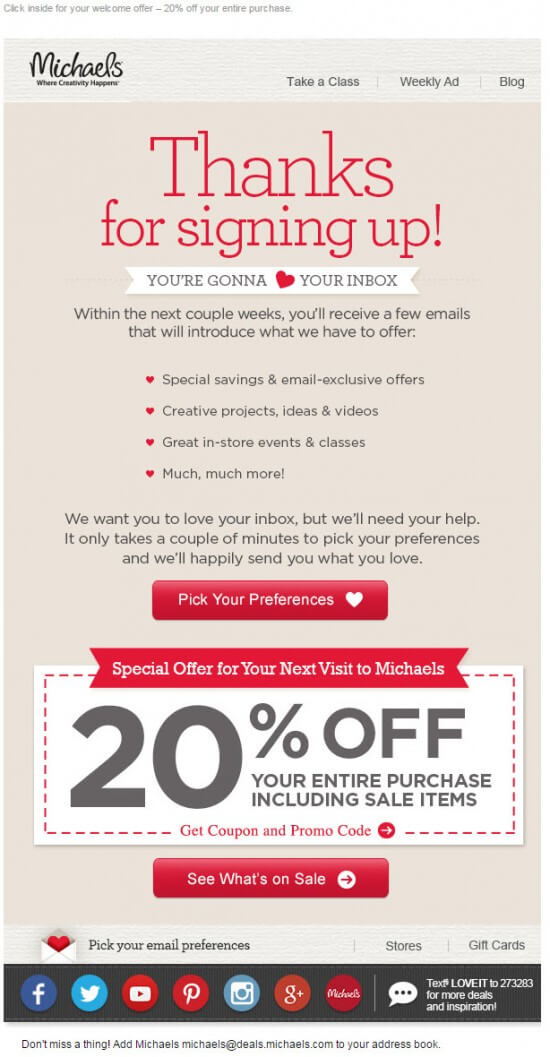
Take a look at this email from Michaels.

Wrapping It Up
Email whitelisting bolsters your email deliverability and gives you the opportunity of forging long-term relationships with your customers. It is critical in maximizing the success of your email campaigns and ensuring that you never lose the edge over your competitors.