


[This post was originally published on 9th June 2020. It has been updated on 21 March 2025.]
Packed with handy templates, forms, buttons, text and a whole plethora of other user-friendly features, Salesforce Marketing Cloud (SFMC) Email Studio is perfect for brands looking to build automated and engagement-worthy custom email campaigns that delight their audience and at the same time elicit interaction from them.
Now, no matter how stunning your 1-to-1 email marketing campaigns with SFMC Email Studio turn out to be, it won’t amount to much if at the end of the day very few recipients interact with these emails. If that’s the case, chances are that you probably have a deliverability problem on your hands.
Email deliverability is the foundation upon which email marketing is built. It is not the same as email delivery. Email delivery is when an email is successfully delivered to the receiving server. Email deliverability on the other hand, is when an email successfully arrives in the recipient’s inbox. It is entirely possible to have good email delivery but poor deliverability, say, because the email landed in the recipient’s spam folder rather than their inbox or because their email address itself is invalid.
Deliverability is often impacted by a number of factors, including Internet Service Providers (ISP), Mail Transfer Agents (MTA), bulking, spam, throttling and bounces. In this guide, we touch on email deliverability in the specific context of bounces. We will cover marketing cloud bounce management in Email Studio, some ways to analyze the root cause of bounces, as well as some best practices to set up SFMC for good email deliverability.
But first, let’s start with the basics.
Unpacking The Meaning Of ‘Bounce’
In simplest terms, an email that can’t be successfully delivered and is sent back to SFMC by the ISP is said to have bounced. A subscriber or recipient is also marked as ‘bounced’ when their receiving email server rejects an email sent from SFMC. ISPs send messages back to SFMC explaining why the email bounced. Analyzing these responses can help the email marketer understand root causes so they can find ways to fix the underlying problems.
Bounce rate is a metric that refers to the percentage of total emails sent that could not be delivered to the intended recipients’ inboxes. If a recipient’s email server accepts the email, their status remains Active in SFMC, but if it rejects the email, their status changes to Bounced.
There are mainly 4 types of bounces that email marketers should be aware of:
1. Soft bounce
This is a temporary occurrence and can be re-tried every 15 minutes for 72 hours (288 tries maximum). When the system stops further retry attempts, the subscriber appears as Bounced. If the email is delivered during one of these 288 attempts and the subscriber opens it, their status is set to Active.
A soft bounce can be caused by a full mailbox, an inactive account or a temporary domain failure. Usually, soft bounces begin with a 4xx explanation.
2. Block bounce
This is a type of soft bounce that occurs when the email server rejects the email due to reasons like a blacklisted IP address, lack of proper authentication, URL blocks or content filtering.
3. Technical bounce
This is also a type of soft bounce that occurs due to technical issues like a busy server, network error or data format error.
4. Hard bounce
This results from permanent conditions like invalid, non-existent or closed email addresses, or a bad or non-existent domain. Since emails will never be successfully delivered, no further attempts are made to send them to this subscriber. If the subscriber’s status was Active, their status now changes to Bounced.
Hard bounces generally begin with a 5xx code.
| Soft Bounce | Block Bounce | Technical Bounce | Hard Bounce | |
| Nature | Temporary | Temporary (specific type of soft bounce) | Temporary (specific type of soft bounce) | Permanent |
| Retry Attempts | Yes (288 attempts over 72 hours) | Yes (within the general soft bounce retry window) | Yes (within the general soft bounce retry window) | No |
| Status Change (if Active) | May remain Active if delivered during retries; eventually Bounced if not delivered | May remain Active if delivered during retries; eventually Bounced if not delivered | May remain Active if delivered during retries; eventually Bounced if not delivered | Changes to Bounced immediately |
| Common Causes | Full mailbox, inactive account, temporary domain failure | Blacklisted IP, authentication issues, URL/content filtering | Busy server, network errors, data format errors | Invalid/non-existent email, bad/non-existent domain |
| Error Code Prefix | 4xx | 4xx | 4xx | 4xx |
Let’s get on to SFMC bounce mail management now.
How To Set Up Bounce Mail Management in SFMC
To set up bounce mail management in SFMC, follow these steps:
- Create an auto-suppression list
- Configure sender authentication package or SAP
- Monitor bounce data
How To Track Bounces In SFMC
Coming to Salesforce Marketing Cloud bounce management, email marketers can easily track and review bounced emails within SFMC. All they need to do is:
Click the Tracking tab -> Click Send -> Click My Tracking
Click the job for which you want to view tracking and then view the ‘Send Performance’ area. This will show you a graphical view of the total number of emails delivered, number of hard and soft bounces, number of clicks, etc.
You can also view detailed bounce data for emails from your SFMC account by querying the bounce data view in Automation Studio. Here’s how to interpret some of the fields in this data view:
1. SMTP response code
This is the code returned by the receiving email server, indicating the status of message delivery. A bounce (hard or soft) gets logged by interpreting the specific response code (5xx or 4xx) related to unsuccessful message delivery. SMTP responses are of three types: bounce reason, message (from the mail system) and error code.
2. Bounce codes
SFMC also defines some fields based on the SMTP data sent from the recipient’s Mail Transfer Agent. These fields include:
· BounceType
· BounceTypeID
· BounceCategory
· BounceCategoryID
· BounceSubcategory
· BounceSubcategoryID
Other fields in bounce data view that can be helpful in analyzing bounced emails include SubscriberID, Domain and EventDate.
Furthermore, when exporting subscriber data (individual or an entire list), one of the fields that can be included for analysis or filtering refers to subscribers’ email status, such as held status in marketing cloud, active, deleted, etc. Each subscriber has one of these statuses, each of which is color-coded accordingly:
· Active: Green
· Bounced (Returned): Yellow
· Held (Undeliverable): Gray
· Unsubscribed: Red
· Deleted: no color
It helps to note that Unsubscribed subscribers (in the context of SFMC Bounce Mail Management) do not get that status because of a bounce, but due to one of these reasons:
· They clicked on an unsubscribe link in an email
· They chose to unsubscribe in a profile center
· They reported an email as spam to an ISP with which Marketing Cloud has a feedback loop
· Their status was manually changed by an SFMC user
More On How To Interpret Email Bounces In SFMC
This diagram illustrates how a subscriber’s status changes from Active to Bounced to Undeliverable. A knowledge of these linkages can help with bounce investigation and mitigation.

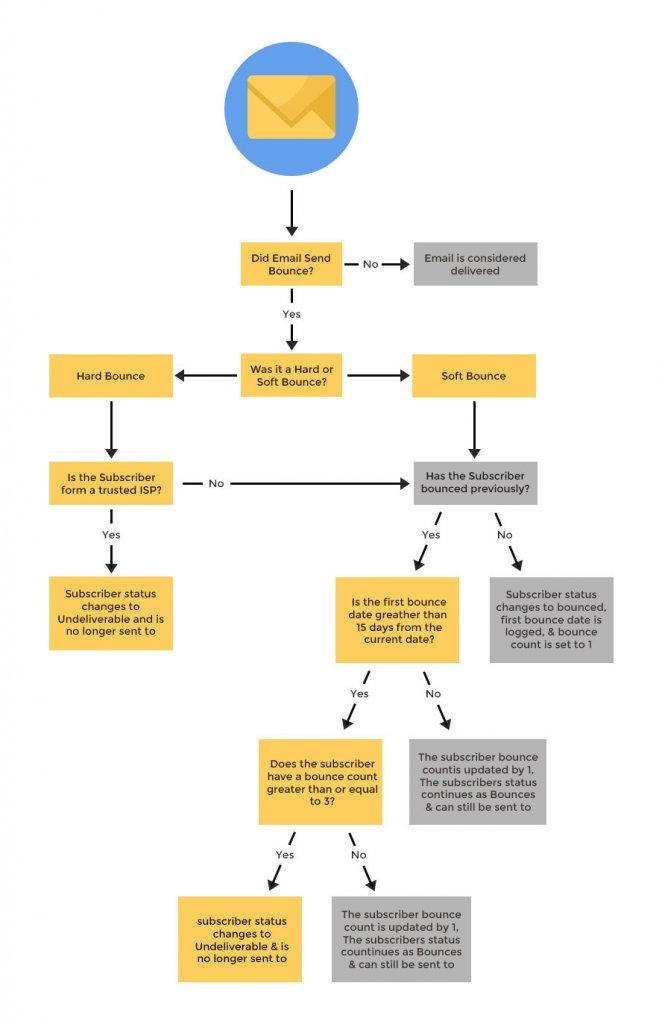
When investigating bounces in an email campaign, a ‘holistic’ approach is best. This means that instead of looking at a particular status code by itself (eg: BounceType or BounceCategory), the investigator should try to interpret all the reply codes. This is especially important because different servers use the same reply codes in different ways, which makes it difficult to be certain about the meaning of each code.
SFMC Email Studio provides several reporting options to track email campaign performance and troubleshoot issues for email marketing bounce management. We have already seen My Tracking in the previous section. Other options include:
· Email Performance by Domain: This report is especially useful if you have domain-specific deliverability issues such as blacklisting or spam complaints
· Spam Complaints over Time: This report shows you how many complaints are received from specific domains that offer spam reporting back to SFMC
· Bounce Event Extract File: This report provides granular information about SMTP error codes for each bounced subscriber
These reports offer specific metrics that can boost your investigation results:
· Bounce rate/delivery rate: A rate below 98% may indicate a deliverability problem
· Open percentage: When plotted over time or per domain, it can provide insights into which domains are under-performing
· Click percentage: This is most useful when receiving domains do not report back on deliverability to SFMC
Troubleshooting Checklist for Bounce Management
1. Configure your Sender Authentication Package (SAP)
SAP configuration in SFMC and your DNS ensures that email providers see you and your domain as legit. It also enables you to set click-path in links and image location to your company domain, configure reply mail management and assign a dedicated IP to your SFMC setup – all benefits that improve email deliverability.
Once you finish this setup, you should also give email servers some time to get used to your IP address. Start with smaller or individual Journey Builder sends then gradually increase the number of bulk emails sends.
2. Be aware of ‘reputation’ factors
Building a reputation takes time but losing it can be next-to instantaneous. Keep in mind these critical factors that can impact your reputation (and consequently deliverability):
· Sending frequency
· Blacklists
· Legitimacy
· Subscriber reactions
· Compliance with CAN-SPAM and other regulations
· SPAM trapped
3. Manage subscriber data
You should only email people who have specifically opted-in. Otherwise you run the risk of sending emails to spam traps which can trigger sending bans.
Once in a while, you can also create a journey or run a campaign on ‘Inactive’ subscribers to weed out the ones who should not be in your subscriber group. If there are no engagements or other account activity from their side, delete them from your subscribers’ list.
4. Make use of Content Detective
Content Detective in Email Studio can help you test your email by simulating content filters in real sends. If there are content issues, the detective will tell you so you can take necessary action before sending the emails.
Wrapping It Up
As an email marketer, you probably spend a lot of time creating compelling email marketing campaigns with SFMC Email Studio for your audience. But don’t ignore the role played by email deliverability and make sure you follow the best practices for improving email deliverability in SFMC! We hope this guide to Bounce Mail Management in SFMC Email Studio enables you to get your lovely campaigns the mileage they deserve.