


Email newsletters are a powerful tool for marketing and brand-building.
“An email newsletter not only increases your audience’s understanding and knowledge of your organization, but when done correctly, is a cost-effective business boost.”
—HubSpot Email Newsletter Guide
To know more about how to design unique newsletters and how to get people to sign up, take a look at our articles here, here and here.
In this article, we show you how to create awesome newsletters with Salesforce Marketing Cloud (SFMC).


How to Generate a Newsletter from Salesforce
Use your own HTML code with templates
- Make sure you have Salesforce Administrator-level access.
- Click on:
Setup | Personal Setup | Email | My Templates | New Template |Custom (without using Letterhead) - Click on Next.
- Name the template.
- Check the Available for Use Checkbox.
- Click Next.
- Add subject line to the newsletter.
- Insert the HTML code in the HTML Body area.
- Store graphs, images, etc., for your newsletters in the documents tab. Also insert the path of the document from there.

Have SFMC generate the HTML code
- Click on:
Setup | Administration Setup | Communication Template | Letterheads - Click on “New Letterhead” button.
- Enter the Letterhead Name, check Available for User
- Click Next.
- Click Save.
- Now click on:
Personal Setup | Email | My Templates | New Template - Select “HTML (Using Letterhead)”.
- Name the template.
- Select a letterhead.
- Check the Available for Use Checkbox.
- Click Next.
- From the email layout dropdown, select the newsletter option and click on Save & Next.
- The next page provides you with the template to fill your newsletter subject and text
- Click on Save & Next.
Once the HTML page is created, use the mass email function to send out your newsletter.
To track users who have read the newsletter, and the number of times they have read it, view Activity History list under the contact.
How to Create and Deploy Newsletters in SFMC in 5 Easy Steps
SFMC provides everything you might need to quickly set up an awesome newsletter for your brand. Simply follow the step-by-step process given below, and you can keep creating unique newsletter campaigns time after time.
1. Import your subscriber list
There’s no point creating newsletters if you have no one to send them to. That’s why this first step is really important. First, make sure your account settings are configured in Email Studio.
Next, get all subscribers into a sendable Data Extension (DE) within SFMC. A DE is a table within the application database that contains both sendable subscriber data like name, email address, country, etc., and relational data, like previous purchases. Before importing subscriber data, first create the DE to house it.
To create a sendable DE:
- Open SFMC Email Studio.
- Click on Subscribers.
- Then on Data Extensions.
- Click Create.
- Choose Standard Data Extension.
- Choose the following in the Create a New Data Extension dialog box:
Creation Method: Create from New
Name: MasterSubscriber
Leave External Key and Description blank
Type: Standard
Leave in default location
Check Is Sendable?
Leave Is Testable? unchecked - Click Next.
- Retention Settings: Leave default Off and Click Next.
- Complete all the information for the first field in the following format:
Name: CustomerID
Data Type: Text
Length: 50
Primary Key: Check. Make sure it does not contain null (empty) values.
Uncheck Nullable
Repeat these steps for each field you want the DE to contain.
To import data into a DE:
You can do this in one of three ways:
- Manually with the Import Wizard located within the DE
- Import Activity to manually bring data into a DE or automate it using Automation Studio
- API call
Before importing data into your DE using the Import Wizard:
- Create the DE
- Have the import file on hand
- Make sure it has at least one row of data
- Make sure it is a comma-delimiter or tab-delimiter file
Then follow these steps in SFMC Email Studio:
- Click Subscribers.
- Click the MasterSubscriber DE.
- Click the Records tab.
- Click Import.
- In the Upload File tab:
Select File Location as My Computer or FTP
Click Browse, and select MasterSubscriber.csv on the Desktop
For Upload file:
– File Name: MasterSubscriber.csv
– Delimiter: Comma
– Date format: English
For Import type select: Leave default Add and Update.
For Import Options: Leave default Skip rows in import file with bad data.
Click Respect double quotes as text qualifier.
Click on Next.
- In the Configure Mapping tab
Verify selection of Map by Header Row.
Click on Next.
- In the Review and Import tab
Verify the parameters you have set.
Notifications: Enter your email address
Click on Import.
Verify that the correct number of records are in the MasterSubscriber DE.
Now you’re ready to move on to Step #2!
2. Build your newsletter with Content Builder
Great newsletter content keeps your customers engaged, loyal, and on-board. For this, SFMC provides an amazing tool: Content Builder.
With Content Builder, you can:
- Create interactive content; it enhances audience engagement, opens, and clicks
- Quickly create responsive emails with pre-built templates, layouts, and content blocks
- Deliver relevant, personalized emails
- Optimize newsletters with Einstein AI features like:
Copy Insights: To craft unique, engaging subject lines
Content Selection: To create personalized content for each customer - Manage assets and speed up approvals to send newsletters out faster
Create newsletters from templates (see below), or:
- Use HTML paste (existing HTML code).
- Create a text-only email
- Modify an existing newsletter
Individualize newsletter content through:
- Personalization strings: To insert subscriber attributes (e.g. name), into the subject line, preheader, or content.
- Dynamic content: Display content based on the rules you define according to specific subscriber attributes or DE field values (see below).
- AMPscript: To embed subscriber-specific content.

How to create memorable newsletters with Email Studio and Content Builder (zero coding required!)
- Go to Content Builder under SFMC
- To upload assets into Content Builder:
a. Click Content.
b. Drag a logo from your computer into Content Builder
c. Click Upload and Publish.
d. You can also import content from SFMC Classic into Content Builder with the Content Import Wizard.
- To create content blocks:
- Static blocks: Content does not change. Example: your brand’s logo
a. Click +Create.
b. Hover over Content Blocks.
c. Select Image Block.
d. Click Browse.
e. Check the box next to the logo and click Select.
f. Adjust any settings.
g. Click Save and Exit.
- Dynamic (individualized) blocks: Content changes based on data found in the DE or the list at the time of a send or push.
i. Click +Create.
ii. Hover over Content Blocks.
iii. Select Dynamic Content and click Browse.
iv. Select the checkbox next to the image of the custom casual sneaker.
v. Click the + next to Create Rule 1.
vi. Select Data Extension or Audience and click OK.
vii. Click Data Extensions.
viii. Select MasterSubscriber and click OK.
ix. Next to Content, click Select.
x. Check the box next to the custom casual sneaker image and click Save.
xi. Drag Interest into workspace.
xii. Select Is equal to.
xiii. Input casual and click Save.
xiv. Repeat the steps to create Rule 2 for other subscribers.
xv. Click Save and Exit.
- To build a flexible, mobile-ready email template:
a. Click +Create.
b. Click Email Message.
c. Select Template and the Basic tab.
d. Choose a layout and click Select.
e. Define the template’s properties: name and description.
f. Click Next.
g. In the Add Content tab:
Drag your new static and dynamic content blocks into the template.
Adjust any pre-existing content blocks.
Leave the subject line and preheader blank.
h. Click Save as Template.
- To create your newsletter from the above template:
a. Click + Create.
b. Click Email Message.
c. Select Template and the Saved tab, click Select.
d. Define the email’s properties: name and description.
e. Click Next.
f. In the Add Content tab:
Adjust the content by week or month (depending on when you send the newsletters)
Adjust subject line (make it cool!)
Leave the preheader blank.
g. Click Next, click Save and Exit.
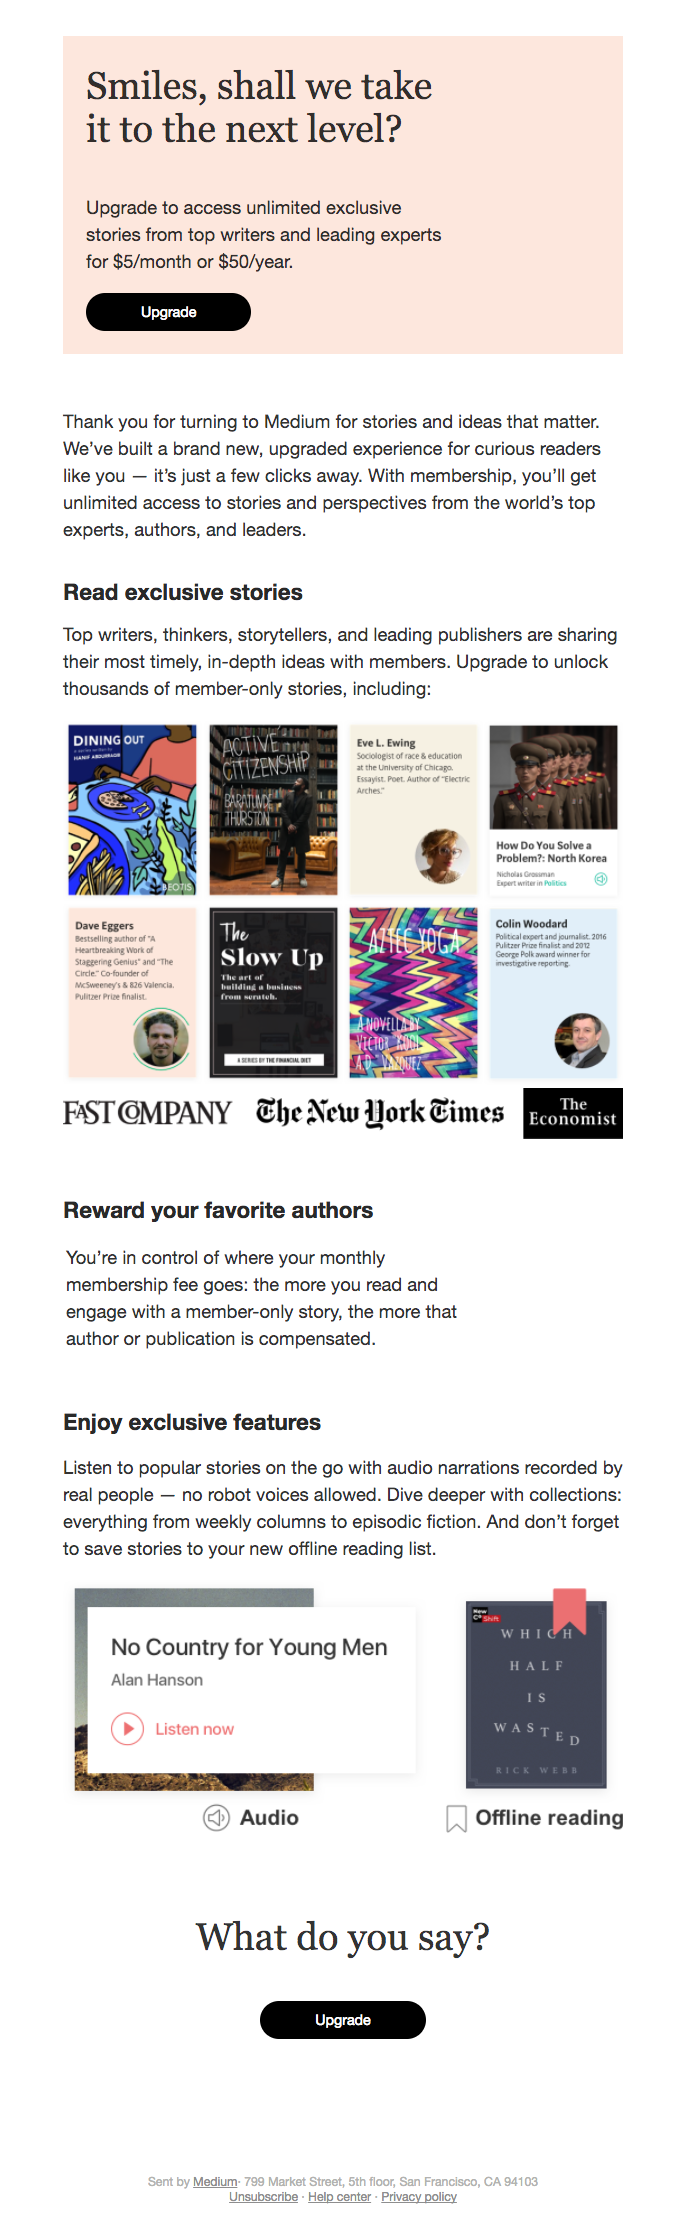
Best practices for newsletter content:
- Make it relevant, visually appealing and well-organized
- Personalize it based on the reader’s demographics, history, or stated interests/preferences

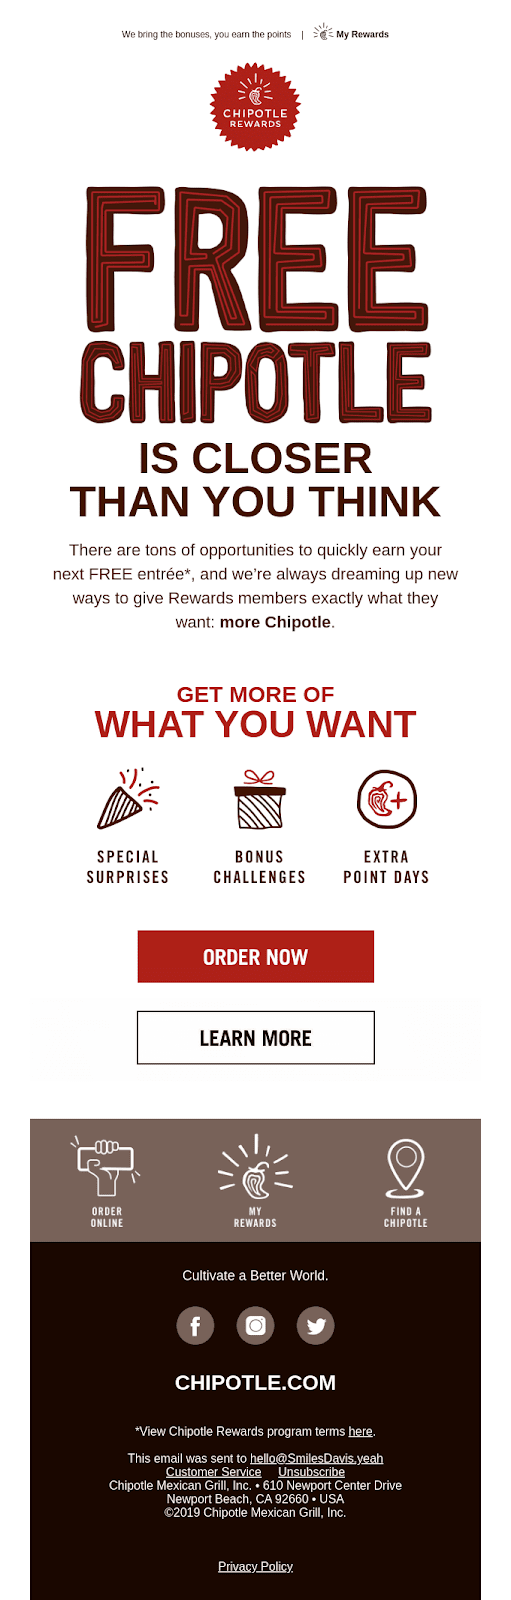
- Include a strong, clear CTA with a visible button
- Include social links in the footer
- Aligns with CAN-SPAM, GDPR and other laws
Once your templates are ready with content, preview and test your newsletter. Then you will initiate the Send Flow in SFMC.
3. Preview and test newsletters
Before sending a newsletter, proof and test it to ensure that email content and design looks exactly as you intend your recipients to see it.
How to proof your emails with Subscriber Preview in Content Builder.
With Subscriber Preview, you can view a single email, including dynamic content, A/B testing, and personalization. Use it to see what the newsletter will look like to an individual subscriber.
- Open the Content tab in Email Studio.
- Click on the down arrow for the email newsletter you want to send.
- Click on Preview and Test.
- Select a subscriber from your DE in the Subscribers tab.
- Preview the email.
- Preview the email.
How to perform a Test Send
A Test Send to a test audience will help you verify that the newsletter looks correct in a recipient’s inbox before you actually send it out.
- Open the Content tab in Email Studio.
- Click the down arrow associated with the email newsletter you want to send.
- In the Test Send tab, enter up to five recipient email addresses OR select a test DE containing all your test subscribers.
- To select personalization options, click Change. You can do this based on subscriber, list or DE, or recipient test DE.
- Complete the From Options section. Only authenticated email domains will appear here.
- Click Send Test.
- Review the Test Send Summary
A quick note about A/B testing:
With A/B testing (aka split testing), you can test subject lines, CTAs, design, content, etc. It works by splitting a small subset of your mailing list into two groups, each of which will receive a different version. Send the more popular version to your larger audience. A/B can help increase click-through and open rates, which can increase conversions and sales.
4. Send newsletters
Now you’re ready to send your newsletters! You can send them either manually or automatically.
For your first send, it is advisable to do it manually, which can do using the Send Flow in SFMC. The email Send Flow represents four stages:
- Define Properties: Edit the subject line, preheader, from options, and send classification.
- Select Audience: Select your audience.
- Configure Delivery: Configure your schedule, send throttling, etc.
- Review and Send: Preview newsletters, review send configurations and correct errors before send.
How to launch a Send Flow
- Open the Content tab in Email Studio.
- Click the down arrow associated with the newsletter you want to send, and click Send.
- In the Define Properties tab, edit Subject, Preheader, From Profile and Sender Classification, and click Next.
- In the Select Audience tab:
a. Click the Data Extensions folder.
b. Drag MasterSubscriber into targeted.
c. Select the All Subscribers publication list.
d. Drag any excluded or suppression DEs.
e. Click Next - In the Configure Delivery tab, schedule the send for a particular time and day, leave tracking as default, and click Next
- Review your newsletter and settings.
- Check the box next to This information is correct and this email is ready to send.
- Click Send.
Congratulations! You have now sent your email newsletter to your selected audience!
5. Monitor newsletter performance
Once you send out your newsletter, review its performance by analyzing some or all these statistics:
- Open rates
- Click-through rates
- Conversions
- A/B test results
- Bounces
- Spam complaints
You can also analyze qualitative performance metrics like:
- Which CTA button performed better?
- Which content chunk was clicked on more?
- Did buttons do well or did text links?
Use this information to adjust your newsletter strategy, design, copy, or layout.
Use the tracking reports feature in SFMC Email Studio to dig deeper into the data, to identify the best- and worst-performing newsletters, and to improve audience segmentation.
To see any metrics not viewable, click Set Grid Preferences.
Wrap Up
We hope this guide helps you create awesome newsletters with SFMC to impress your audience. But if you don’t have the internal resources required to leverage the full potential of this ESP, you can outsource your newsletter project to a specialist team like Email Uplers. Click here to discuss your requirements with our email marketing experts.