


Choosing Outlook for email marketing is usually discouraged. Initially designed for office use, the argument goes that Outlook is yet to outgrow its native context and become a dedicated environment for email marketing.
All that said, Microsoft has been persistent in its attempts to upgrade Outlook to the point of standardizing it as a tool for email marketing as well. Many email marketers and agencies, including ourselves, use Outlook for dedicated email campaigns.
In fact, even when not used for email marketing, brand representatives rely on Outlook to boost marketing efforts, and email signatures play a critical role here.
Corporate identity, personal branding, brand identity, etc. may be classified under the soft goals of email signatures. The hard goal is to generate leads.
Email signatures include calls to action and social media links through which senders can track the click-through rate, engagement rate, and conversion rate on those alternative channels, allowing them to thrive off of full-scale marketing campaigns.
But how to create a signature in Outlook? What are the steps involved? How does the process vary from one operating system to another?
This post will answer all of these questions. Email signatures are one of the consistent requirements from our clients across several ESPs and email clients. So, let’s begin!
- How to Create A Signature in Outlook 2024
- How to Create A Signature in Outlook 2016-19
- How to Create A Signature in Outlook 2010
- How to Create A Signature in Outlook 365
- How to Create A Signature in Outlook for Mac
- How to Add An Email Signature in Outlook (Mobile)
- How to Add Multiple Signatures in Outlook
- How to Edit Signatures in Outlook
How to Create A Signature in Outlook 2024
Follow these steps for creating an email signature in Outlook 2024:
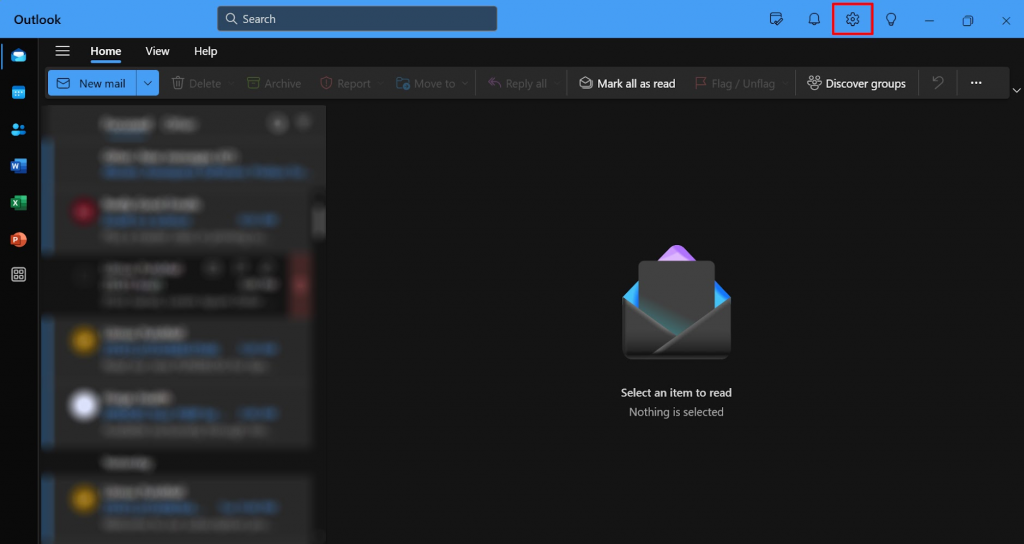
- Open the new Outlook. Go to Settings (the gear icon).

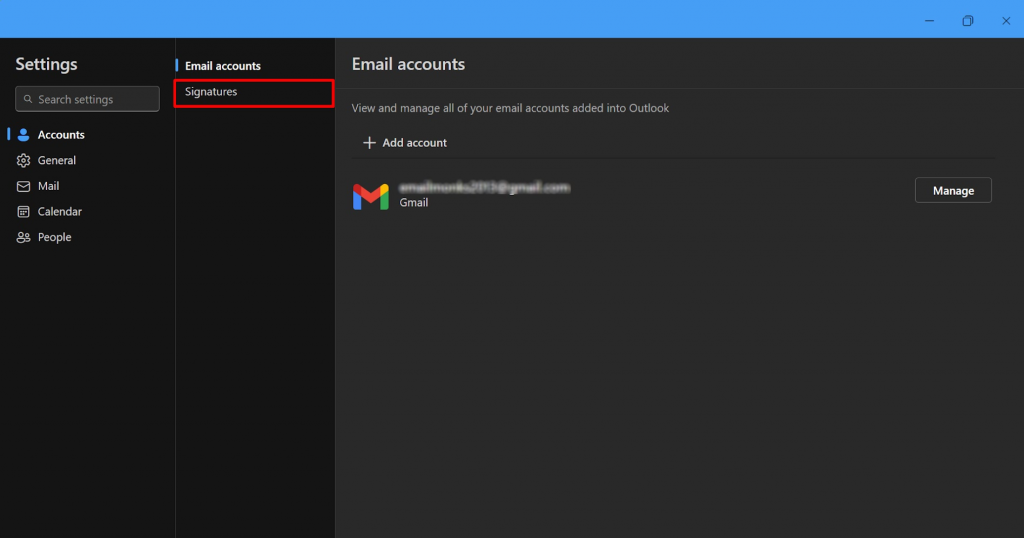
- Upon clicking Settings, you can see the Signatures option. Click on it.

- Click + New Signature, as shown here.

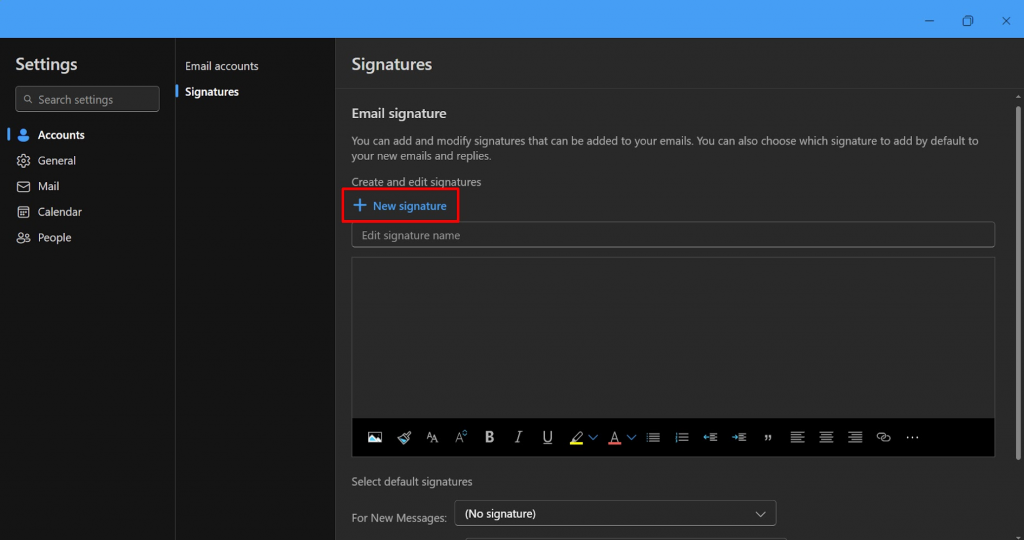
- Finally, click Save.


Read More: 10 Email Signature Software Expert Picks & Reviews in 2024
Formatting The Signature
Formatting your email signature in Outlook 2024 is a piece of cake. Here are the options and corresponding steps:
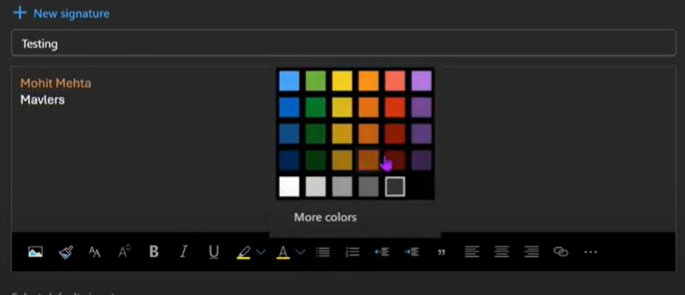
- To modify the text color, select the default text color and click the upward menu. Then, choose a color from the options provided, or select “More colors” for a custom choice.
- To adjust the text size, navigate to the Font Size upward menu after selecting the text.
- To change the font type, select the text and access the Font type upward menu.

Adding An Image
To add an image to your signature in new Outlook, follow these steps:
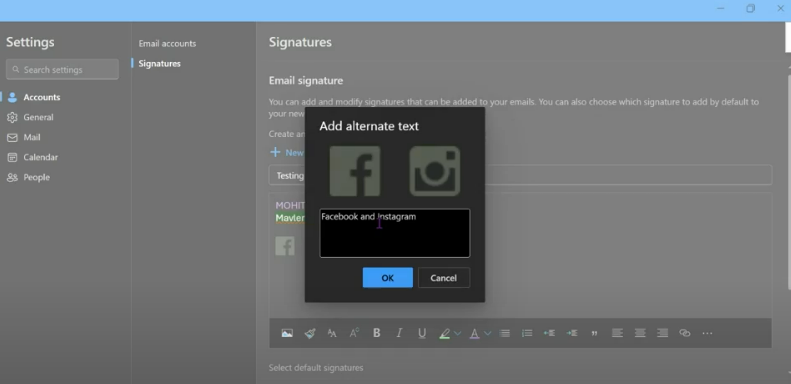
- Click on the Insert pictures inline option on the leftmost corner of the ribbon.
- Choose the image you want to add from your device
- Click Save (You can also add alt-text to the image added, as shown).
Setting Auto Signatures
To automate email signatures in Outlook 2024, follow these steps:
- Scroll down beyond the ribbon to locate the Select default signatures option.
- You can set a default signature for New messages or Replies/Forwards. Select your preferred option(s).
- Enter the name of the new signature you created. Then, click Save.
Read More: How to Create Email Templates in Microsoft Outlook
How to Create A Signature in Outlook 2016-19
Follow these steps to create a signature in Outlook 2016-19:
- Go to Outlook’s in-app editor

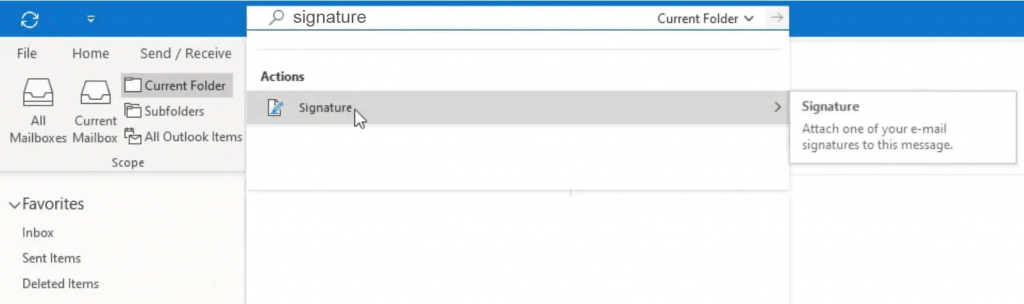
- Click on the search box at the left side of the screen at the top.
- Type in “signature”.
- “Signature” result will appear on the screen. Click on that.
- Select the “Signature” option from the dropdown menu. Subsequently, you will be able to create Outlook email signature template using the in-app editor.
- Click on the “New” button to prepare a new signature for your email.
- Assign a name to the signature. This is especially important if you plan to create multiple signatures.


- Add the specifications for the signature.

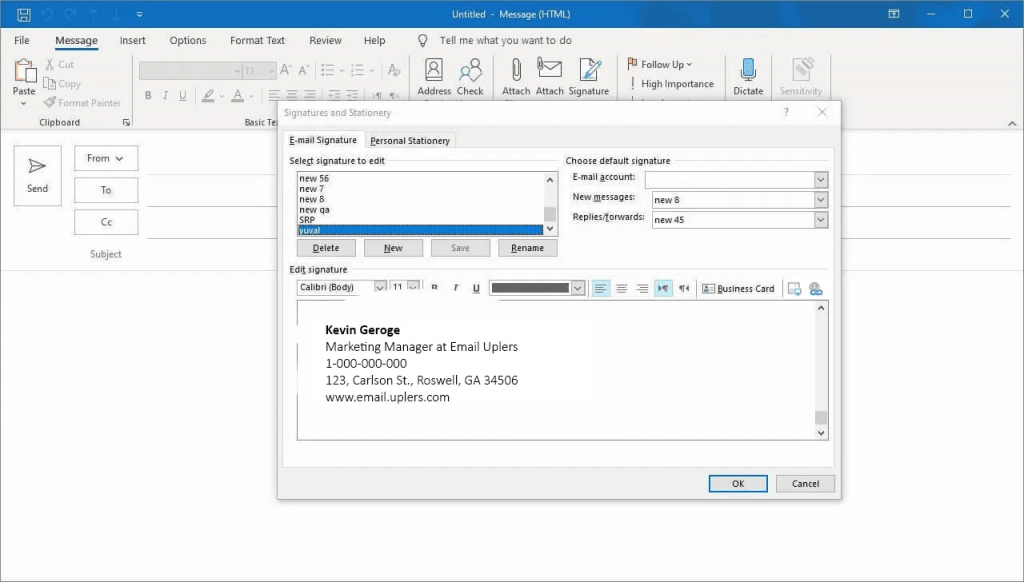
- To create a simple text signature, go to the text field in the signature editor.
- Type your name, designation, and contact details.
- Click OK.
Read More: Top 5 Outlook Email Rendering Issues And How to Fix
Formatting The Signature
Similar to the visual hierarchy in email designs, your email signature should also prioritize important information through suitable font colors and sizes.
To format your signature in Outlook 2016-19, follow these steps:
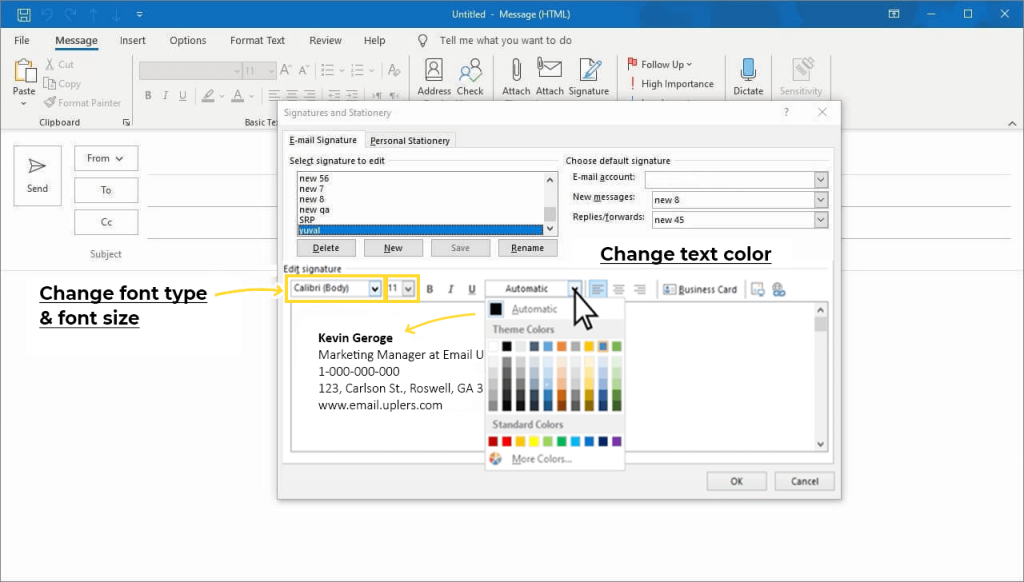
- To modify the text color, select the default text color and click the dropdown menu. You can then choose a color from the options provided, or select “More colors” for a custom choice.
- To adjust the text size, navigate to the Font Size dropdown menu after selecting the text. You can then pick the appropriate size based on the hierarchy.
- To change the font type, select the text and access the Font type dropdown. From there, you can choose the most suitable option to reflect your brand personality and industry.
You can take it a step further by including a hyperlink in your Outlook signature. Highlight the text that you want to hyperlink. The selected text should appear in a gray background. Click on the link icon located on the right side of the toolbar. Enter the URL and click OK.
If you want to make your telephone number clickable, simply add the prefix “tel:” to the phone number like “tel:1-000-000-000”.
For brick-and-mortar business owners, it’s possible to make their local address clickable and redirect users to Google Maps navigation. First, find your business on Google Maps and click on the “Directions” button. Then, copy the URL from the address box.
Next, select the address from the Outlook signature and add the link from Google Maps just like you did for the website URL. Click OK, and you are done.
Read More: An Inside Look at The Email Design & Development Process


Adding An Image
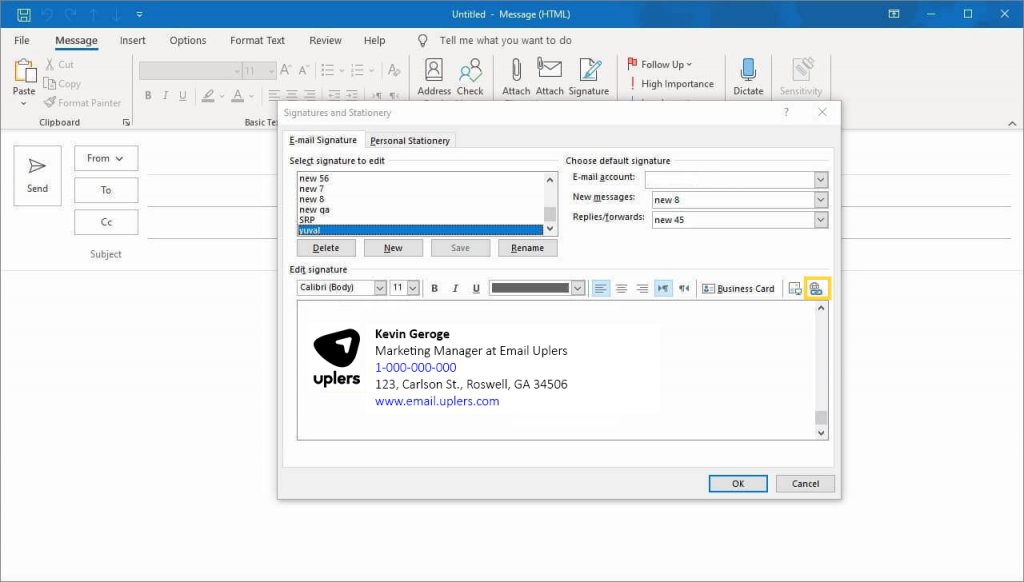
To add an image to your signature in Outlook 2016-19, follow these steps:
- To insert the image into the signature, simply place the cursor where you want the image to appear.
- Then, locate and click on the image icon on the right-hand side of the toolbar.
- Upload the image from your computer.
You’ll need to resize the image. Click on the image and drag one of the black squares at the corners of the image to resize it to fit your email signature.
You can also make the image clickable by selecting the image with the cursor and then clicking on the link icon from the tool strip. Add the URL and click on OK.
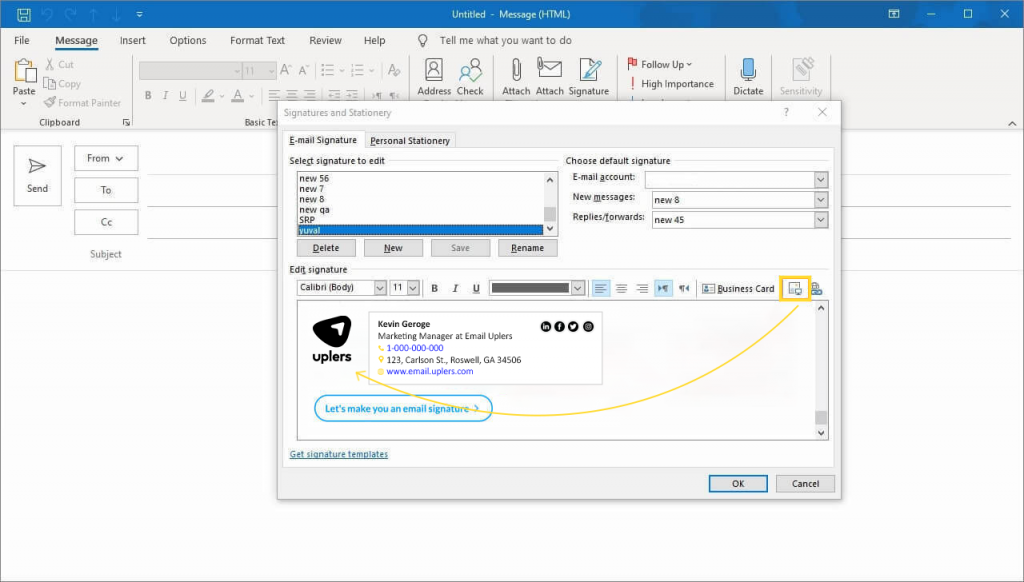
To add social media icons for increased brand visibility, simply add the icons as images and position them appropriately. Then, select each icon and click the link button from the toolbar to add the correct link to each icon.
You can utilize the editor’s toolbar to insert a table and arrange the signature in rows and columns. Keep in mind that the appearance may vary based on the screen size, so ensure that the signature width remains under 360px. Maintain a consistent font color that aligns with your branding guidelines.
To enhance visibility, opt for a slightly larger font size for your name and job title compared to your contact details. Display your name in bold font and keep your job title and company name in regular font to emphasize the name.
Setting Auto Signatures
If you’d like to set up an Outlook signature to automatically appear in your emails, you have the option to choose whether it should be displayed in new messages only, or in both forwarded and replied messages.
To do this, go to the top-right corner of the Outlook editor. There, you’ll find two dropdown menus; one is for setting an auto signature for new messages, and the other is for forwarded/replied messages. Each menu will display a list of available signatures. Simply select the signature you want to use and then click “OK” to save your preference.
To preview the signature, open a new message in the Outlook interface and you’ll see it at the bottom.
Read More: Hyper-personalization in Email Marketing
How to Create A Signature in Outlook 2010
To create a new signature in Microsoft Outlook 2010, follow these steps:
- Open Microsoft Outlook 2010 and click on the “New” button to create a new signature.
- Assign a name to the new signature and click OK.
- Draft the signature in the text box using the available editor tools.
- Avoid pasting the signature in image format, as it is not recommended.
To edit a signature:
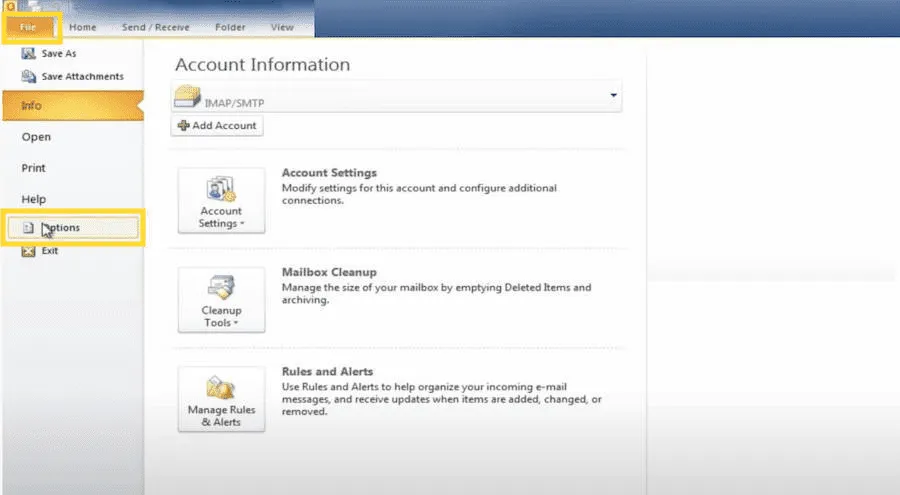
- Select the File tab and click on Options from the left side menu.
- In the Options window, select Mail from the menu to edit the signature.

How to Create A Signature in Outlook 365
Follow these easy steps to create a signature in Outlook 365:
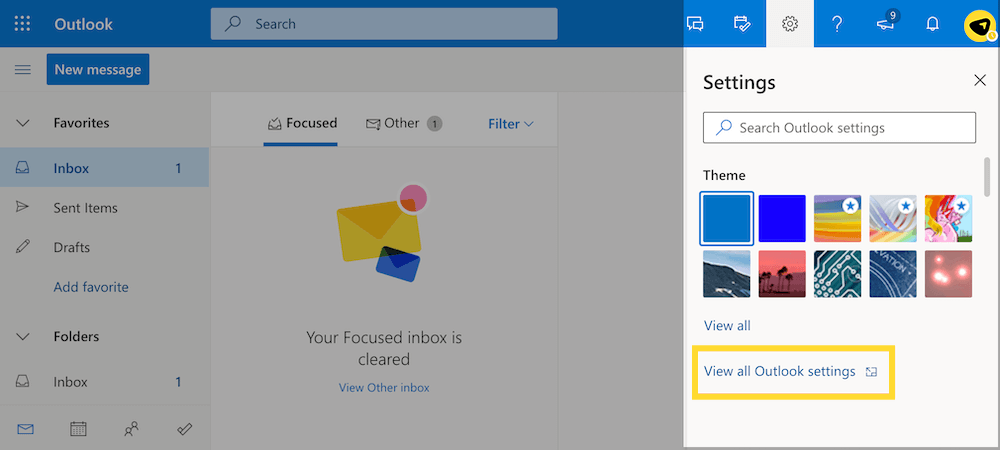
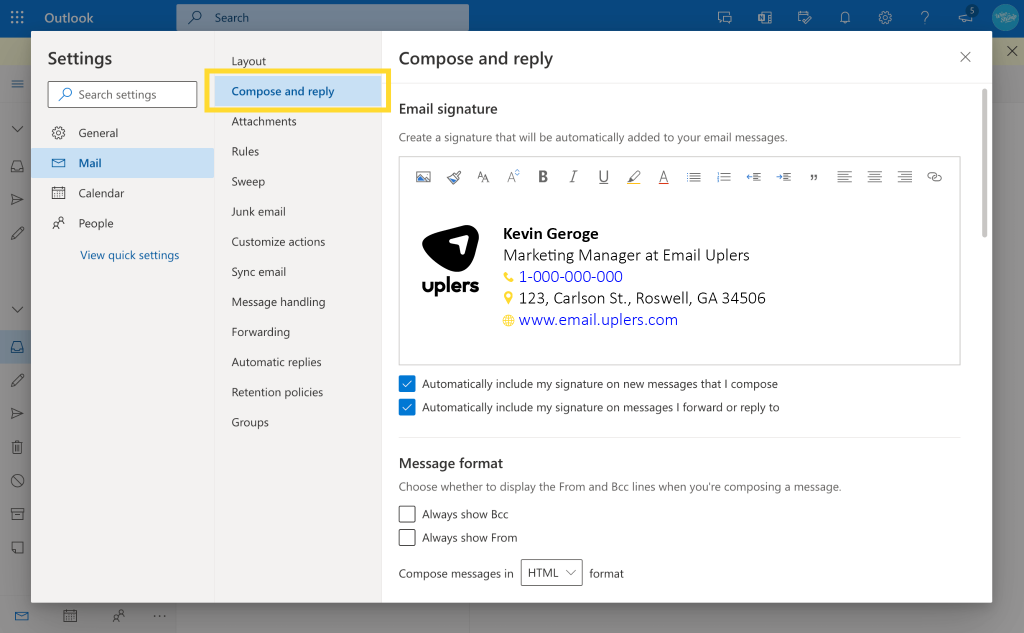
- To access the settings in Outlook 365, click on the gear icon located at the top right corner. This will open the Settings menu on the right. Scroll through the menu and select “View all Outlook settings.”

- Open the signature editor and select “Compose and reply” from the left sidebar.
- Create the signature by writing the details in the in-app signature editor.
- Click on “Save” once done.

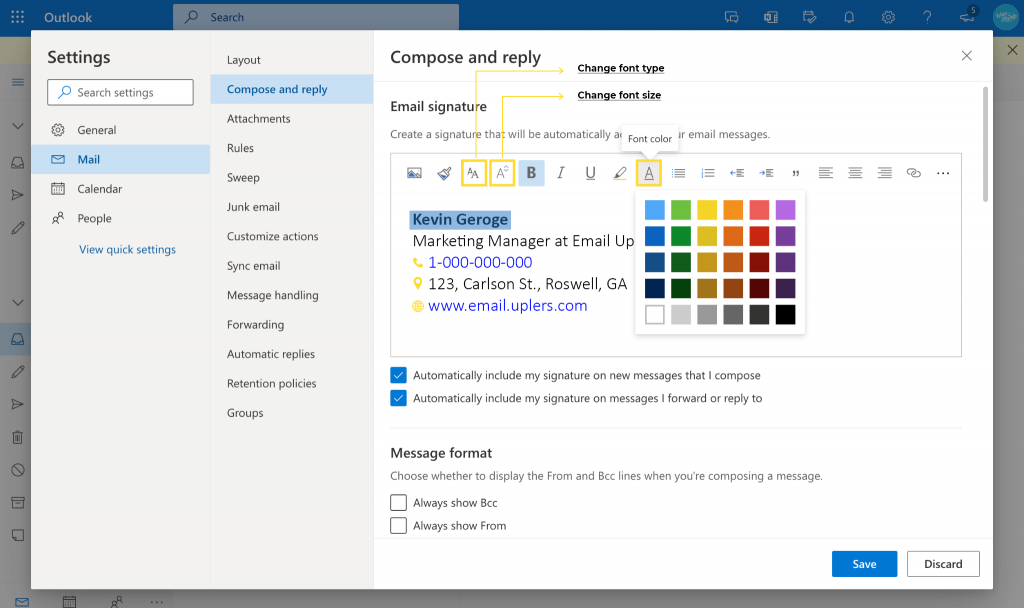
Formatting The Signature
Just like Outlook 2016-2019 versions, you can format your signature with the help of the toolbar at the top. It will allow Similar to Outlook 2016-2019 versions, you can use the toolbar at the top to format your signature. This feature allows you to customize the font color, font size, alignment, and text formatting such as bold, italic, and underline.

To add a hyperlink to the signature, simply select the text you want to link and then click on the link icon in the toolbar. After that, insert the URL, and you’re all set.

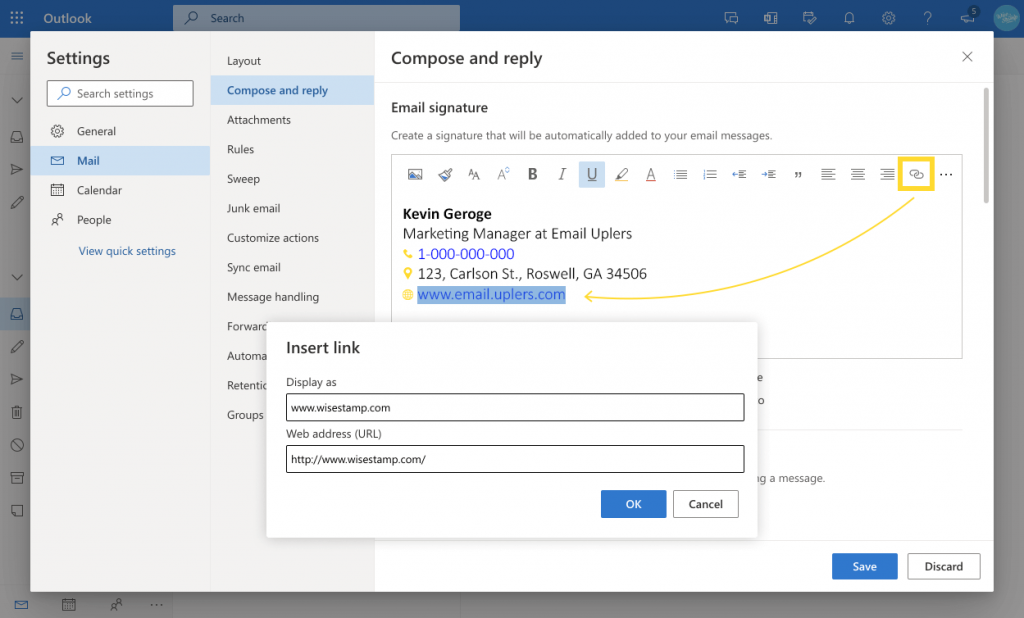
You can also create a clickable telephone number by adding the “tel:” prefix before the phone number. For example, “tel:1-000-000-000”. This allows users to directly place a call by clicking on the number.
Adding Image to the Outlook 365 signature
To add an image to your signature in Outlook 365, follow these steps:
- To insert an image, select the image icon on the toolbar and upload the desired image from your computer.
- Then, drag and drop the image into the appropriate position or use cut and paste.

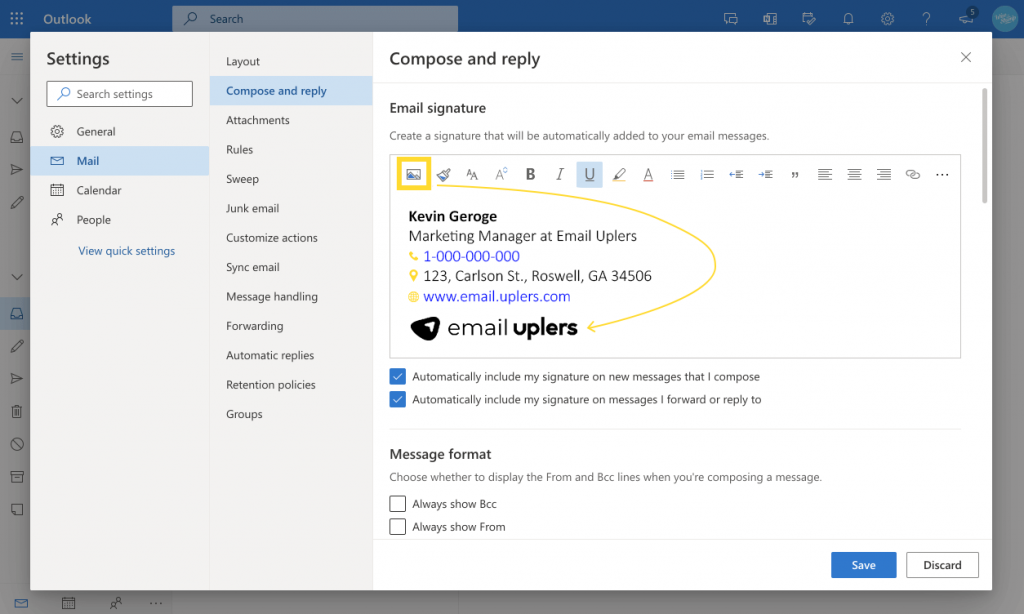
Experiment with various image sizes to achieve the best visual appeal in the signature.
Keep in mind that in Outlook 365, you won’t be able to add an image from a URL. Additionally, adding an image may cause the signature layout to break.
Read More: The Ultimate Guide to Email Templates – Everything You Need to Know
Setting Auto Signatures
To set up your default email signature in Outlook, go to the settings and choose the default signature for new messages as well as for replies or forwards.
Once done, save your changes and your signature will appear in all your emails.
You have the flexibility to modify your signature at any time. You can also include your signature in individual emails. If you deselect the options for new and forwarded or replied emails, you can then manually insert your email signature into a new message whenever needed.
Keep in mind that Outlook 365 permits only one automatic signature per account, so you’ll need to manually copy and paste the signatures whenever you wish to use them.
How to Create A Signature in Outlook for Mac
Follow these steps for creating a signature in Outlook for Mac (desktop):
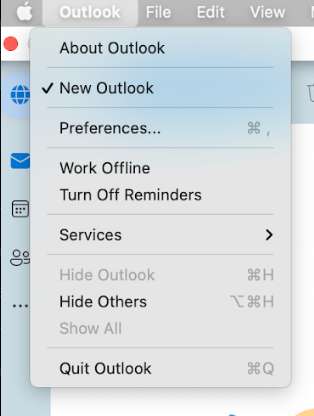
- Open Outlook and navigate to the Outlook dropdown. Then, click preferences.

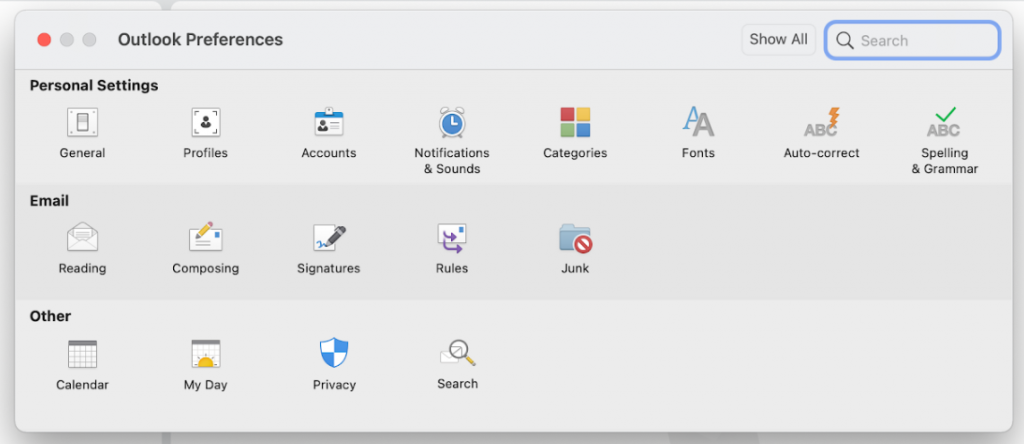
- Click on “Signatures.”

- Select the ‘+’ button to add a new signature

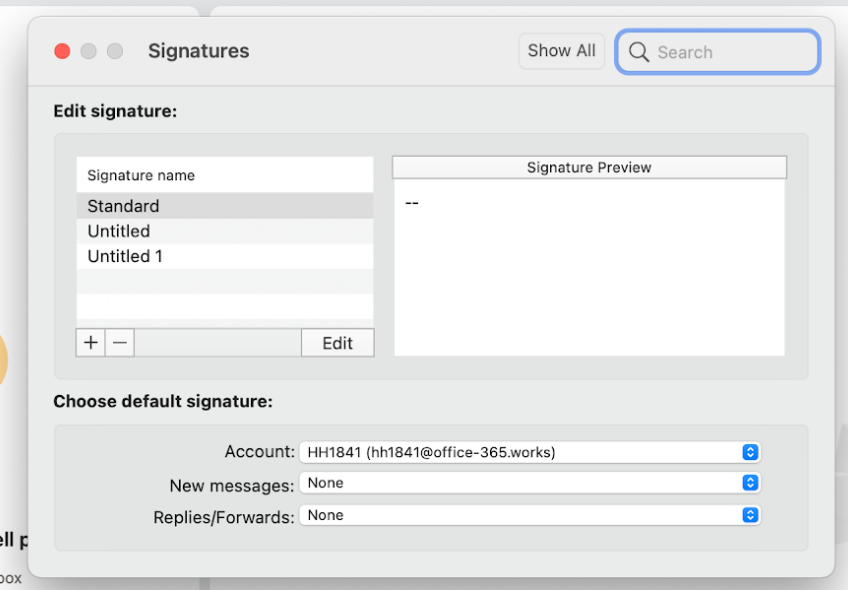
- Click on the edit option
- Paste your new signature, then click Save


How to Add An Email Signature in Outlook (Mobile)
Follow these steps for the Outlook email signature setup in mobile:
- To access the Outlook app on your Android or iOS device, start by selecting the account image in the top left corner.
- Then, tap the gear icon at the bottom left to open the Outlook settings.
- Next, select the “Signature” option to access the signature settings.
- Input all the necessary details to generate the signature.
- Tap on the check mark located at the top right to finish the setup.
In addition, here are the steps to add a link to your Outlook signature on mobile:
- Open a new message in Outlook.
- Create your signature in the new message window.
- Type the text you want to hyperlink and then insert the URL.
- Select the entire signature and copy it.
- In the top left corner, click on your account image.
- Click the gear icon and open Outlook settings at the bottom left.
- Open the signature settings by clicking on “Signature”.
- Paste the signature in the signature text field.
The functionality of email signatures in Outlook varies between Android and iOS.
Read More: Best Tips to Design Perfect Mobile-Friendly Emails
In Outlook for Android, you cannot add an image to your email signature, whereas in Outlook for iOS, you have the capability to include images, icons, and buttons using HTML. In Outlook for Android, you can only have a plain text-based signature with links.
Adding Multiple Signatures in Outlook
Here’s how to create multiple signatures in Outlook desktop versions (2013, 2016, and 2019):
- Open Outlook and go to the search box at the top-left side.
- Type in “signature” and click on the “Signature” result shown on the screen.
- Click on “Signature” from the dropdown menu to open the Outlook signature editor.
- Click on the “New” button to create multiple signatures and assign logical names to distinguish them.
- Click “OK” and then open a new message.
- Click on “Signatures” at the top of the toolbar and pick the signature of your choice.
Outlook 2007 and 2010:
- Open a new message in Outlook.
- Go to the top ribbon and choose “Signature,” then select “Signatures.”
- Click on the “New” button in the Outlook signature window to create multiple email signatures and add suitable names to differentiate them.
- When opening a new message, click on the “Signature” button from the top ribbon and pick the suitable signature from the dropdown menu.
Outlook 365:
- Navigate to the gear icon at the top right corner of Outlook 365.
- Write “signature” in the search box at the top of the Settings panel and select the “Email signature” result.
- Create a “new signature” with the in-app signature editor and assign the correct name to your signature.
- Click on “Save” to complete the process, and to create more signatures, click on the “New signature” button.
Other methods to create multiple signatures in Outlook include using the “My templates” option in the web app or using an external document, such as HTML editor or graphic design software, to prepare and save signatures for later use.
Please note that Outlook mobile does not allow you to create multiple signatures.
Read More: How to Perform Mail Merge in Outlook with Attachments
How to Edit Signatures in Outlook
Follow these steps to edit signatures in Outlook for Windows:
- Open Outlook. Click on the File tab.
- Select Options. From the dropdown, choose Mail.
- Scroll down to Signatures, then click Edit.
- Update your signature in the Signature Editor.
- Click OK.
To edit signatures in Outlook for Mac, here are the steps:
- Open Outlook. Navigate to the Preferences section.
- Select the Signatures tab.
- Under Signature Name, select the signature you need to edit.
- Click Edit to add changes.
- Once done making the changes, click Save.
To edit signatures in Outlook 365, follow these steps:
- Log in to your Outlook account.
- In the upper-right corner, click the Gear icon.
- Select Email, then select Compose and Reply.
- Add changes in the text block under Signature.
- Click Save.

Tell Us Your Outlook Email Marketing Needs!
At Email Uplers, we manage all aspects of email template integration and ESP migration. Our team of experts is skilled in over 50 ESPs, guaranteeing smooth transitions and top-notch performance. Need help with Outlook? Feel free to get in touch with the team.
For more information on email signatures, check out the top 10 email signature software platforms in 2024.