
HubSpot’s email marketing tool lets you create and send personalized emails to your contacts. It’s integrated with HubSpot CRM, so you can tailor your messages based on the contact data you’ve collected. And with the help of custom HTML integration in HubSpot, you can create fully customized email templates with more control over the design and functionality than what is possible with the standard drag-and-drop builder.
In this blog post, our HubSpot experts guide you through the process of uploading your emails to your HubSpot account.
There are three methods of doing it. We’ll kick off in the following order:
Method 1: HubSpot Basic
In this method, you only need to add the live HTML file to the template and then create the email. In addition, do NOT change any text, images, or other design elements. Here are the steps to upload your email to HubSpot:
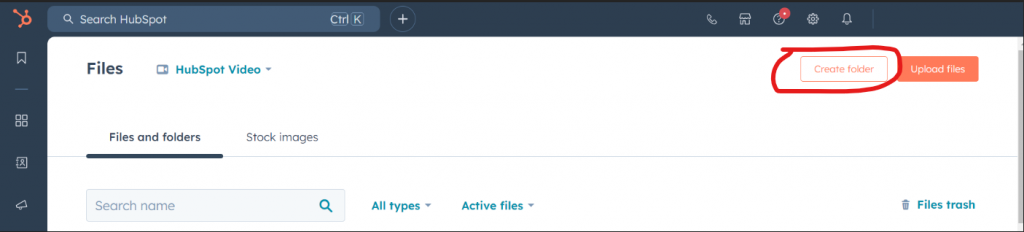
- If coded according to the design, then all local images must be made live, and the HTML file will also go live. Go to the Library > Files > Create a folder > Drag all the local images into the folder > Get the live paths of the images and insert them into the HTML file.
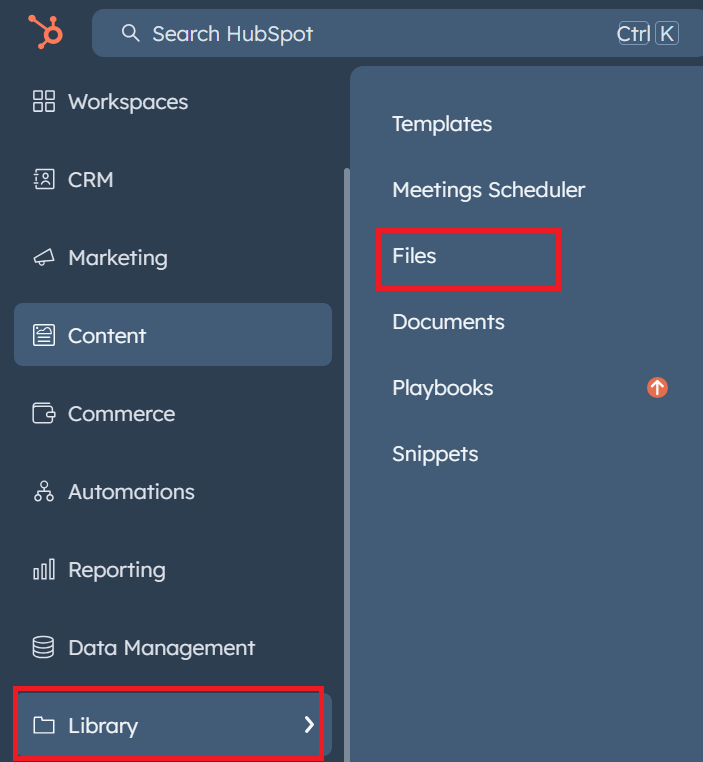
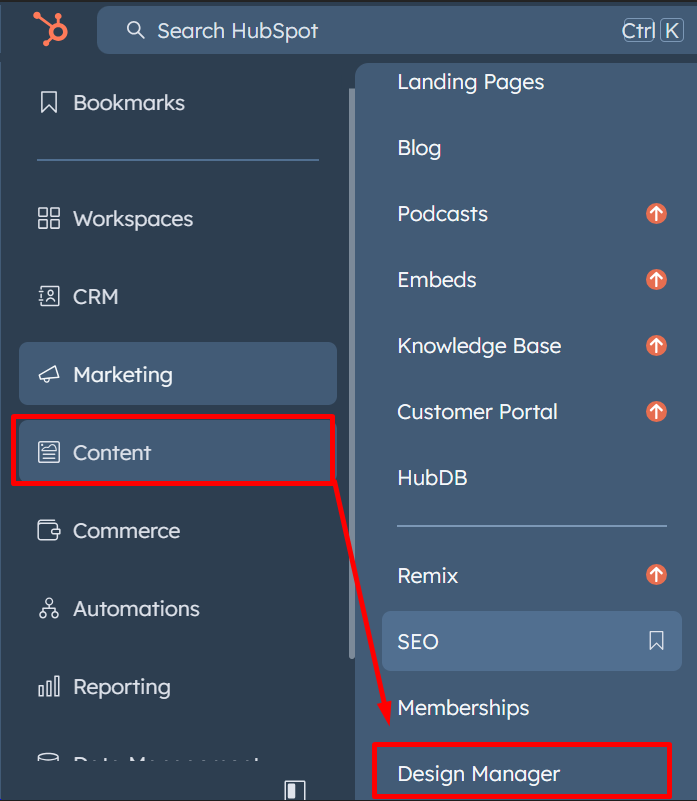
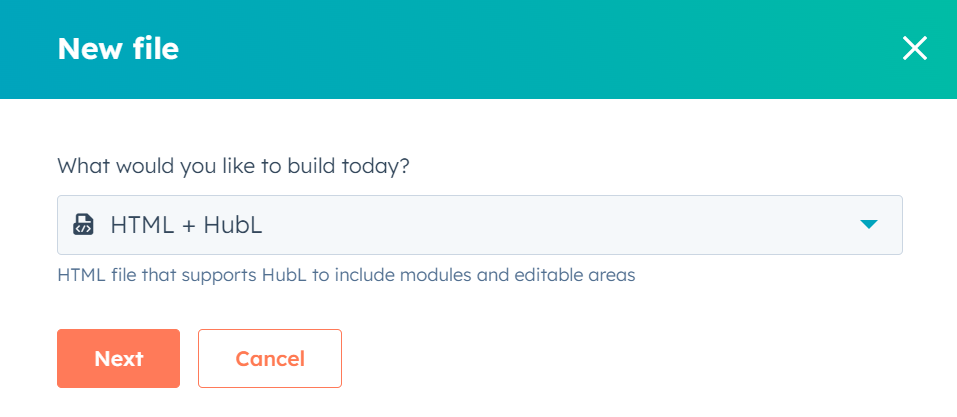
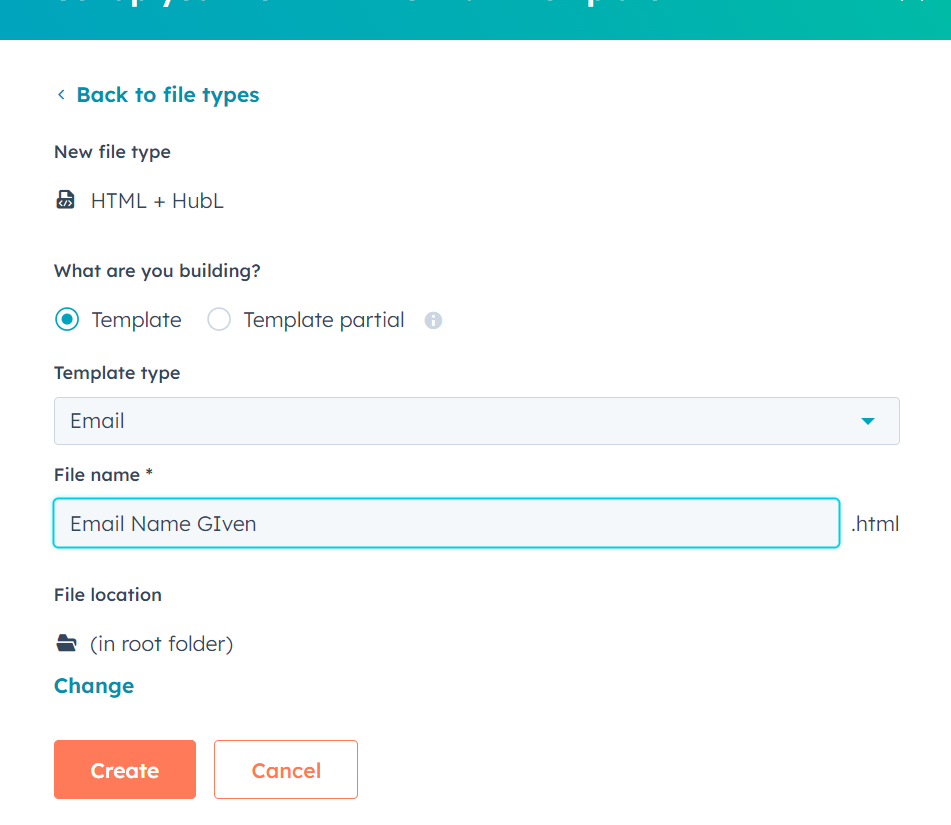
- Once the HTML is live, you need to create the email. Go to the Content > Design Manager > Create a New File > Select: HTML + HubL > Template > Template Type : Email > Name your email template.
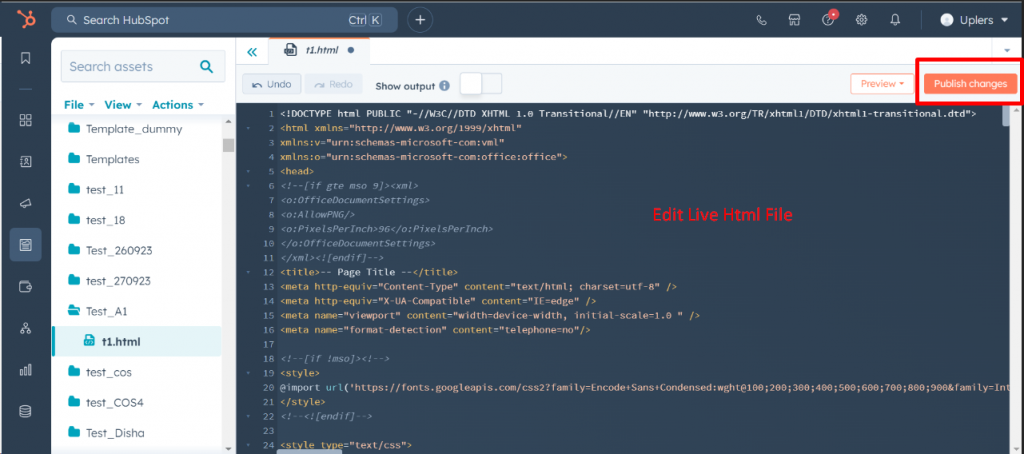
- After creating the template, add the live HTML into the blank space and publish the template.
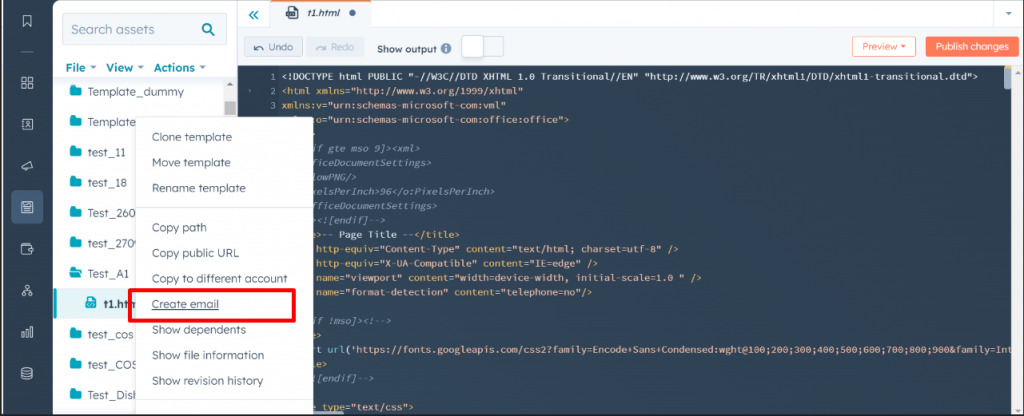
- After publishing, right-click on the email name and create the email as shown in the screenshot below.
Note: The <tr> must be added in the footer; otherwise, the template will not be published.
<tr>
 <td valign="top" align="center" style="font-size:13px; font-family:Arial, sans-serif; color:#303030; line-height:16px;"> {{site_settings.company_name}}, {{site_settings.company_street_address_1}}, {{site_settings.company_city }}, {{site_settings.company_state}},{{ unsubscribe_link }}</td>
 </tr>

Method 2: HubSpot Advanced (HubL)
In HubSpot email marketing, HubL is a templating language that allows you to create customized, dynamic emails.
In HubL, you need to edit text, images, and other elements. You may also need to repeat or delete sections.
Sections cannot be dragged and dropped to the top or bottom. Follow these steps to upload your email to HubSpot using the HubL method:
- Code as you do. <table><table>. Add id=”hs-inline-css” in the main style, and note that no special characters will be supported in HubSpot files. If the coding is done according to the design, then all local images must be made live, and the HTML file will also go live.
- Go to the Library > Files > Create a folder > Drag all the images into the folder > Get the live paths of the images and insert them into the HTML file
- For image integration, add the following code:
{% linked_image "header_logo [ Given Unique Name ]" label='header_logo [ Given Unique Name ]', link="#", open_in_new_tab=True, alt='As per the image Alt', src='https://dummyimage.com/160x40/808080/ffffff?noresize', width='160', style='border-width:0px;border:0px; width:160px; max-width:160px; display: block; font-size:20px; line-height:24px; color:#000000; font-family:Arial, sans-serif; text-decoration:none;' %}
- For text integration, add the following code:
{% rich_text "text_02 [ Given Unique Name ]" label="text_02 [ Given Unique Name ]", no_wrapper="True", html="Headline text goes here" %}
- Repeat sections in the following manner:
{% set my_options = [0, 1, 2, 3, 4, 5, 6, 7, 8, 9, 10] %}
                    {% choice "repeats1" label="Section Name", value="1", choices="{{ my_options }}", export_to_template_context=True %}
                    {% for options in my_options %}
                    {% if loop.index <= widget_data.repeats1.value %}

             ------------<table>------------------

{% endif %}
{% endfor %}
Note that in the above condition, if you need to repeat multiple sections, you should change the choice ‘repeats1’ to { ‘repeats2’, ‘repeats3’, ‘repeats4’ } as per your section repeat.
- For deleting sections, use the following code:
{% set my_options = [0, 1] %}
                    {% choice "repeats1" label="Section Name", value="1", choices="{{ my_options }}", export_to_template_context=True %}
                    {% for options in my_options %}
                    {% if loop.index <= widget_data.repeats1.value %}

             ------------<table>------------------

{% endif %}
{% endfor %}
Note that in the above condition, if you choose ‘0,’ the section will be deleted. To display the section, you need to choose ‘1’.
As before, the <tr> must be added in the footer; otherwise, the template will not be published.
<tr>
 <td valign="top" align="center" style="font-size:13px; font-family:Arial, sans-serif; color:#303030; line-height:16px;"> {{site_settings.company_name}}, {{site_settings.company_street_address_1}}, {{site_settings.company_city }}, {{site_settings.company_state}},{{ unsubscribe_link }}</td>
 </tr>
You can see the entire process in action below.

Method 3: HubSpot COS
You need to edit images, text, background color, and text color. You can also add, delete, and drag-and-drop sections to the top or bottom.
Importantly, you must code with a width of 600px. Please check to ensure the design width is 600px.
Now, there are two ways to upload your email to HubSpot COS:
- All module in template
- All module in email (Choice and Group field)
Let’s understand each method in detail.
1. All Module in Template
In the first method, after finishing up the code, follow the steps shown in the video to make the local images live, and then integrate the COS.
2. All Module in Email
You need to put the editable content into one module and use group fields to organize it. Otherwise, all editable fields will be displayed on the left side of the email editor, making it hard for the client to identify each area of the module.
Additionally, you need to use the choice functionality to create a dropdown selector, allowing the client to select the modules to add.
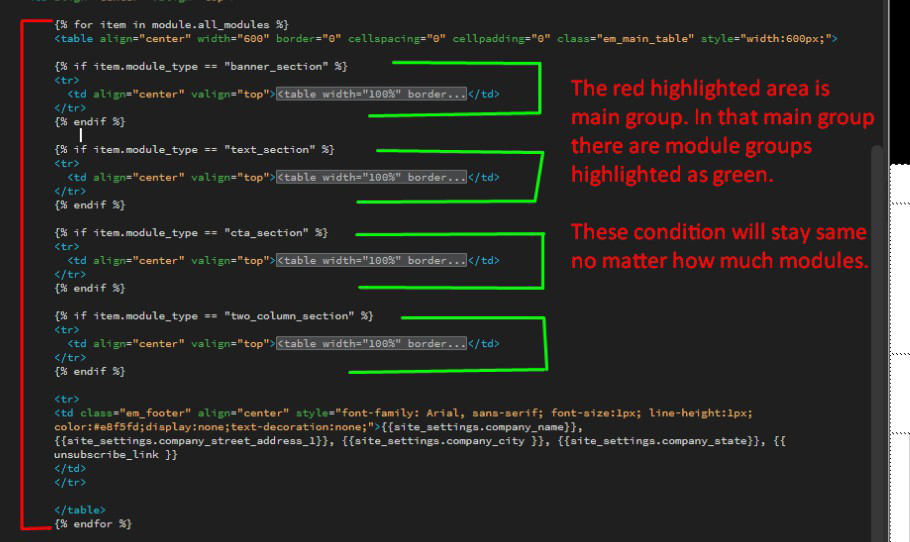
After reviewing and publishing the images, define the main group area and ensure that the modules are in HTML. Use concise names when uploading and avoid using very long ones.
{% for item in module.all_modules %}
<table align="center" width="600">
{% if item.module_type == "banner_section" %}
<tr>
</tr>
{% endif %}
{% if item.module_type == "text_section" %}
<tr>
</tr>
{% endif %}
</table>
{% endfor %}
Take a good look at the following screenshot for better understanding.
Coming now to editable tags, the process of giving editable tags to images, text, and other editable areas differs slightly from the normal COS method.
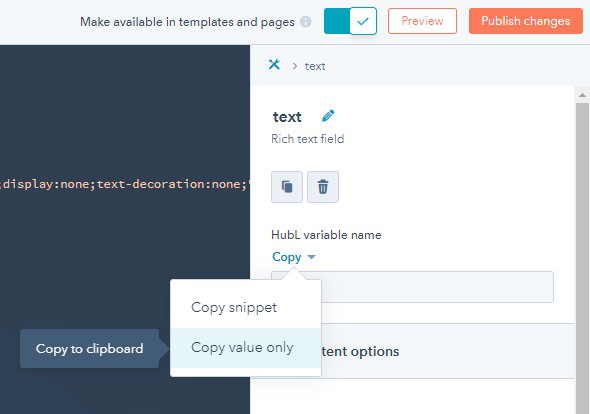
If you copy the variable from the screenshot above, it will provide you with the following value:
{{ module.text }}
However, the value we need to provide depends on your module name, which we defined in HTML. You need to remove “module” and replace it with “item.module_name”:
{{ item.text_section.text }}
module = item.module_name
We recommend you to watch this video to understand the process in depth.

It’s crucial to assign the correct variable to the editable area. Arrange the groups and choice selector as demonstrated in the video. Also, it’s important to follow the upload method exactly as shown in the video.
Here are the steps:
- Ensure that the HTML is live and that you have defined the modules.
- Create a choice field as demonstrated in the video, using the module names defined in the HTML for labels.
- Add editable fields for the modules and create a group for the editable fields of a specific module.
- Create a main group called “individual_module.”
- Change the “Display Condition” for each individual module group:
- individual_module.module_type
- is equal to
- enter module name here
- Create an email after 1-2 modules are ready so that we can check if the functionality is working correctly.
Note: In all the three HubSpot methods you must add the following tags, or the template will not get published:
- {{site_settings.company_name}}
- {{site_settings.company_street_address_1}}
- {{site_settings.company_city}}, {{site_settings.company_state}}
- {{unsubscribe_link}}
Get More Insights into HubSpot Email Marketing
For more information on HubSpot email marketing, please visit our blog.
We are also HubSpot-certified experts. We can help you with end-to-end HubSpot email marketing. From campaign deployment to automation management to migration to HubSpot, we can do it all. Get in touch today!
Aanal Rana
Aanal Rana is currently working as a Senior HTML Developer at Email Uplers. She has 6 years of experience in Email Development, specializing in creating email templates and newsletters. Aanal is also skilled in working with leading email marketing platforms, including HubSpot, Salesforce, Marketo, Klaviyo, MailChimp, Pardot, Iterable, and Campaign Monitor.
Priyanka C
With three years of experience as an HTML developer at Uplers, Priyanka specializes in email template development, combining technical expertise with creativity. Outside of work, she enjoys reading and staying updated with the latest technological trends to inspire her passion for innovation.
Susmit Panda
A realist at heart and an idealist at head, Susmit is a content writer at Email Uplers. He has been in the digital marketing industry for half a decade. When not writing, he can be seen squinting at his Kindle, awestruck.
The Developer’s Guide: Optimizing for Apple Mail in Dark Mode
How to Create A Responsive Email Template – The Only Guide You’ll Ever Need