“Every contact we have with a customer influences whether or not they’ll come back. We have to be great every time or we’ll lose them.”
–Kevin Stirtz, Author, Business Thought Leader
Every present-day thought leader, business influencer, and accepted wisdom would agree that the only way to run a successful modern business is by putting the customer at the center of everything. This requires getting to know them better, creating products and services that improve their lives, and understanding how, when, and why they interact with the brand. Here’s where customer journey mapping comes in.
Salesforce Marketing Cloud (SFMC) provides a user-friendly tool to design powerful customer journey strategies and create effective customer journey maps. With SFMC Journey Builder, you can create 1:1 marketing journeys that encompass numerous touchpoints for each customer, from initial contact to purchase and beyond. By visually representing every interaction that a customer could have with your brand – via every possible channel, including email – within a single interface, you can glean valuable, actionable insights about them. Then you can leverage this goldmine of information to drive and improve your email marketing initiatives.
Journey Builder is constantly evolving to help you automate more actions as you map and optimize your customer journeys. And one of its most amazing features is Path Optimizer – part of the flow control activity family in Journey Builder.
Path Optimizer is a great way to identify the most effective journey for your customers, and make on-the-fly adjustments to your marketing strategies to better meet your business goals. And in this guide, we explain everything you need to know about this amazing functionality within SFMC Journey Builder.
What is Path Optimizer in SFMC Journey Builder?
Path Optimizer was part of the May 2020 release of Salesforce Marketing Cloud.
As the name suggests, it helps you test various journey paths so you can select a “winning” branch, and thus identify the best way to reach customers.
Does this sound like A/B testing?
To some extent. However, Path Optimizer is different from A/B testing. Here’s how.
With A/B testing, you can only test your emails for two variables, such as subject lines, images, CTA text, from name, etc. to determine the best version to send to your recipients. A/B testing is useful for determining which email version is likely to get more opens, clicks, and conversions before sending it to everyone on your mailing list.
Think of Path Optimizer as A/B testing x 10. This means that unlike the two-variable limit in A/B testing, you can leverage Path Optimizer to configure branches with up to 10 paths in Journey Builder with user-defined distributions. Here, a path is a sequence of events in a customer journey. The winning branch is automatically (or manually) selected based on email engagement metrics to receive the relevant email message. All losing paths shut off the flow of contacts. Read on to know how Path Optimizer works.
Use Case: Path Optimizer to Test a Welcome Email Campaign
Suppose you want to create a welcome journey in SFMC Journey Builder.
A welcome campaign is a great way to greet new customers when they sign up to receive your email communications. You can either send a single campaign as AirBnB does below, or you can use Journey Builder to expand from a single email to a series of messages to further improve the customer experience.
Here’s what your welcome campaign might look like:
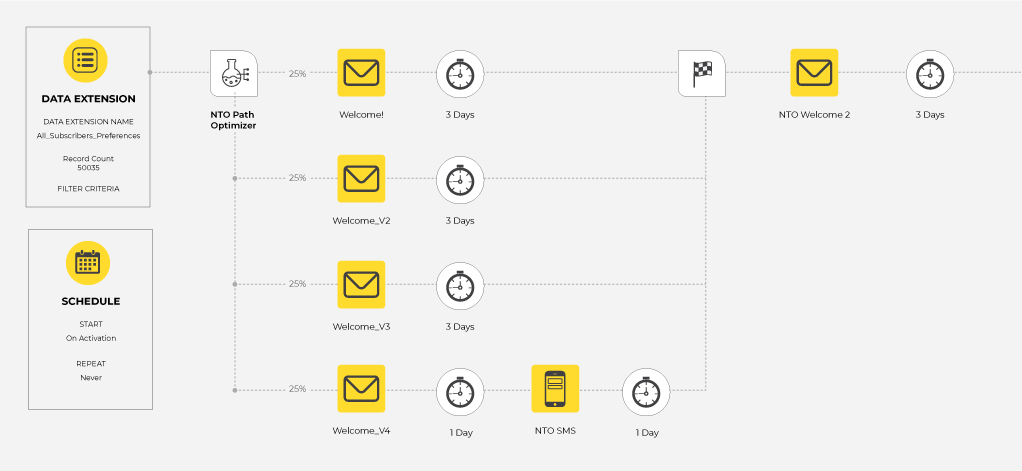
With Path Optimizer, you can experiment with multiple paths/emails for a single welcome campaign, so it might look something like this:
Each of the first welcome emails is on the same journey but a different path. All 4 paths culminate in welcome email #2. With Path Optimizer, you can easily test these 4 paths simultaneously to determine which one performs better in terms of:
- Contacts
- Open rates
- Click rates
- Unsubscribe rates
Once the test is complete after a predetermined testing period (which is usually just a few days), the winner is automatically selected based on a specific engagement metric(s).
You can also select the winning path manually based on your own criteria. Either way, you don’t have to wait for weeks to gather pre-insights about your email campaign. Rather, you can quickly select the path with the highest probability of success, and thus get your campaign out quickly.
Path Optimizer and Journey Builder Flow Control Activities
SFMC Journey Builder provides a number of flow control activities:
- Wait activities
– By duration
– Until date
– By attribute
- Decision splits
- Random splits
- Engagement split
- Join
- Path Optimizer
All these activities help create the customer’s (or contact’s) journey path.
Most flow control activities either:
- Wait for something to happen before they can kick off (e.g. until X date)
- Allow for journey splits based on some decision (e.g. “only if city = Boston”)
They allow you to test your campaigns and run experiments with content and sending frequency. But if you’re using the engagement split and need to determine which branch a contact should go down according to engagement metrics – use Path Optimizer.
With Path Optimizer, you can experiment and choose a winning path (automatically or manually) while the journey is still running. In simple terms, you can select a winning branch, and send the message to all subscribers entering that path of the journey. You can also optimize different population segments or milestones by placing many activities within the same journey.
How to Add a Path Optimizer to Your Email Journey
It’s easy to add a Path Optimizer within SFMC Journey Builder’s drag-and-drop interface. Here’s how to do with our earlier Welcome email example.
1. Create a Path Optimizer test
i. Navigate to Journey Builder and select the Welcome Journey.
ii. Click New Version to create a new version of the running journey.
iii. Under Flow controls, locate the Path Optimizer activity. Drag that activity to the beginning of the new journey.
iv. Click the Path Optimizer activity to configure.
v. Enter a name and description for the activity.
vi. Click Configure Winner Evaluation.
2. Determine a Winner
i. To choose a winner automatically within a certain time frame based on the highest click or open rate, or lowest unsubscribe rate; select Email Engagement.
ii. To measure opens, select Open Rate as the engagement metric. Also, choose a test duration.
iii. If you have wait periods in your test paths, make sure you factor them in.
iv. To select a winner manually, click on the Path Optimizer test activity in a running journey.
3. Determine Splits and Holdbacks
i. Select the number of test paths and the percentage of subscribers you want to receive the tests.
a. Select Split under Winner Evaluation.
b. Click + Add Path twice to add two additional test paths.
c. Adjust your audience percentage for each path.
d. Click Summary to review the configuration, then click Done.
In this step, you can determine if you want to split and hold back any subscribers to only receive the winning path – ideal if your subscriber list is large, and you want more people to enter the most successful journey path. The split percentage must add up to 100%. Also, holdback audiences are only available for a one-time scheduled journey, not ongoing journeys.
4. Create Test Paths
Suppose you want to test the original email, the same email with two subject lines, and a new email with different content, follow these steps:
i. From the journey canvas, drag the existing Email activity to the empty activity slot in path 1.
ii. Add a new email activity to path 2 and click the activity to configure.
iii. For path 2, select the same existing email as the first path, but under Message Configuration, update the subject line.
iv. Click Done.
v. Review the configuration and click Done again to return to the journey canvas.
vi. Follow the same steps to update the subject line for the path 3 test.
vii. For path 4, select the new email with alternative content.
viii. To finalize the journey, add a wait step after each email and click Save.
Now you can validate, test, and activate your Welcome journey.
During testing, you can manually select a winner by clicking Select Winning Path, or you can wait for the test to complete for the automatic result.
Wrap Up
In SFMC Journey Builder, Path Optimizer provides a scientific way to experiment and improve your email journeys so you send the best possible email to each subscriber. Test any kind of journey and optimize it to boost the performance of your email campaigns.
If you need help with leveraging Path Optimizer for your email program, we can help. Contact the Email Uplers team today.


Chintan Doshi
Latest posts by Chintan Doshi (see all)
5 Best Practices to Optimize Data Management in Salesforce Marketing Cloud
How to Ace Personalized Email Marketing With Interactive Content