
In email marketing, a merge tag is a piece of code that acts as a placeholder for data from your subscriber list.
So far, so good. But here’s the prob: The type and specificity of merge tags vary from ESP to ESP. Plus, who’s got the time to read up page after page of documentation? On average, ESP documentation runs over a hundred to thousand pages. Plus x2, even if you read it all, how many times are you going to switch tabs mid-campaign just to check again? 😐
But then, there are ESP-specific experts like us, specializing in more than 50 ESPs, and always here to help you.
In this guide, you’ll learn how to use Mailchimp merge tags.
As Mailchimp pro partners, we have helped many clients over the last 12 years with their Mailchimp requirements. So, let’s tee off!
How Merge Tags Work in Mailchimp
Mailchimp merge tags are of two types:
- System Merge Tags: These pull data from your Mailchimp account. They allow you to include elements like RSS content, social sharing links, and account details. Additionally, system merge tags can be used to translate emails and add links for updating profiles, unsubscribing, or forwarding emails.
- Audience Merge Tags: These pull data from your audience records. Audience merge tags enable you to include information such as email addresses, signup form URLs, first and last names, company names, and other audience-specific details.
Each audience field in Mailchimp corresponds to a specific merge tag. When a merge tag is included in an email, it is replaced with the content stored in the respective audience field (ensure all your contact information is uploaded correctly). For example, |FNAME| automatically inserts the recipient’s first name into the email.
Some merge tags are linked to additional content, such as text or images, via URLs.
To link an image to a merge tag, use the hyperlink tool found in the editor toolbar to embed the merge tag in the URL. When subscribers click on the linked image, they’re directed to the URL specified by the merge tag. Whenever you send an email containing merge tags, Mailchimp retrieves the latest data from the corresponding audience fields. So, here’s an overview of some commonly used merge tags and their functions:
- *|ARCHIVE|*: Creates a “View in browser” link, directing subscribers to your email campaign page.
- *|BRAND:LOGO|*: Inserts a default logo placeholder, useful for custom templates as a substitute for an image URL.
- *|MC:TRANSLATE|*: Adds links that let subscribers translate your email into different languages.
- *|DATE:X|*: Displays the date in a specified format. Replace X with your desired date format.
- *|SURVEY|*: Generates a one-question survey with a set no. of responses for subscribers to select from.
- *|FNAME|* and *|LNAME|*: Display the subscriber’s first name and last name, respectively.
- *|EMAIL|*: Shows the subscriber’s email address.
- *|UNSUB|*: Inserts an unsubscribe link, typically placed in the email footer.
- *|FORWARD|*: Adds a “Forward to a friend” link, enabling subscribers to share your email with others.
- *|TWITTER:PROFILEURL|*: Includes a link to your X profile in the email.
So much for Mailchimp merge tags in general. Let’s learn how to use the Mailchimp first name merge tag.
How to Add Name in Mailchimp Email
To add a name in Mailchimp emails, follow these steps:
- Create a List: Start by ensuring you have a list containing all the required contact information.
- Design Your Campaign: Choose to either create a new campaign or edit an existing one.
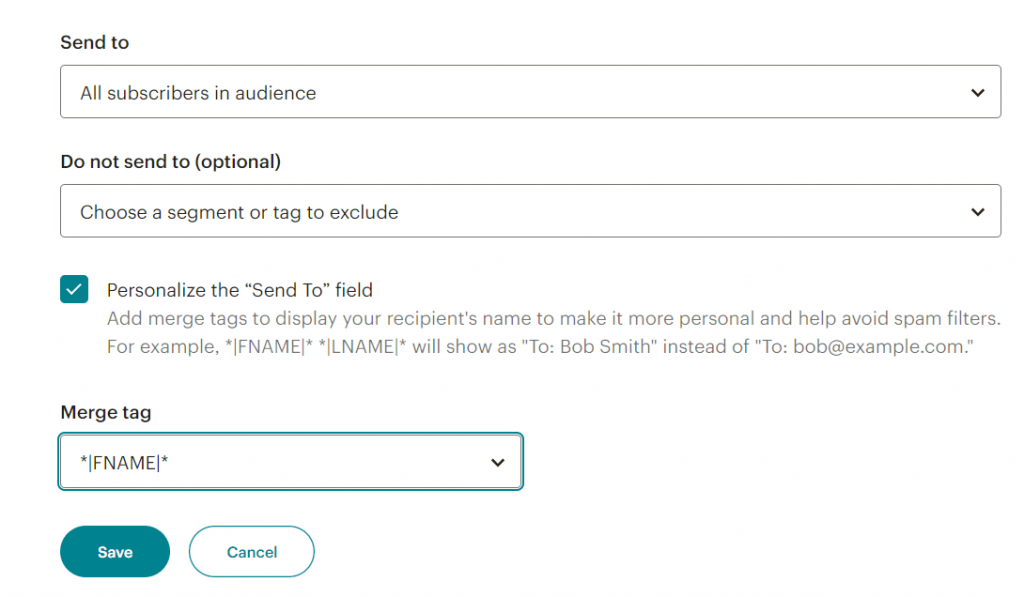
- Select Your Audience: Specify the recipients for your email campaign in the “To:” section, as shown below.

- Personalize the “Send To” field: You can either choose to include just the first name or the full name of the recipient.
Next, add Mailchimp merge tags in the subject line.
How to Add Mailchimp Merge Tags in Subject Lines
You successfully personalized the email in the last section. Follow these steps to add the subject line:
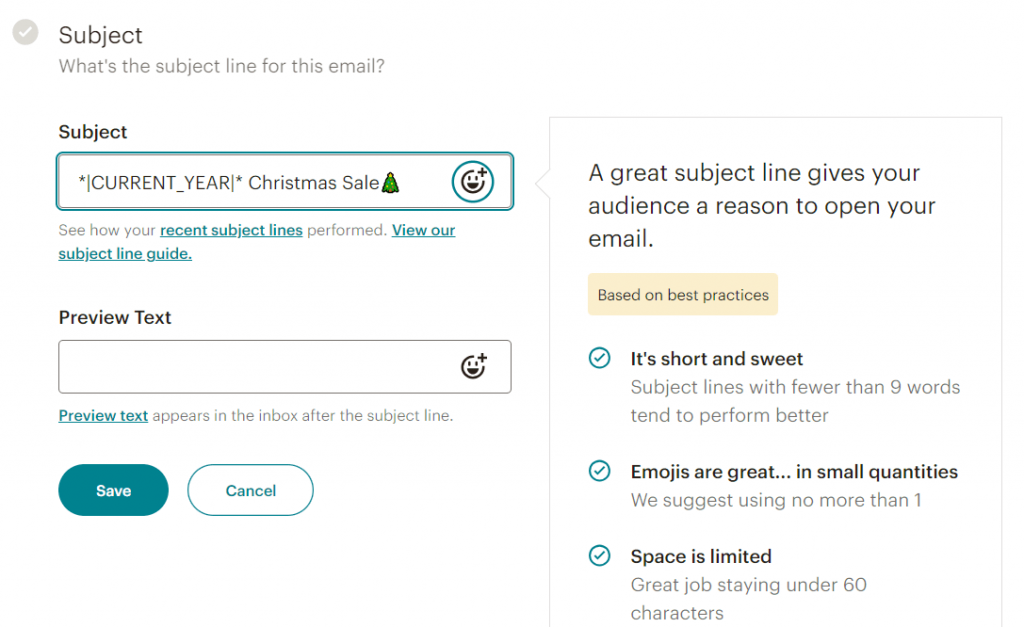
- Define the subject line: Write the subject line and include the appropriate merge tag to personalize it, as shown.
- Set the Send Time and Edit Email Content: Select the send time for your campaign, and customize the content.
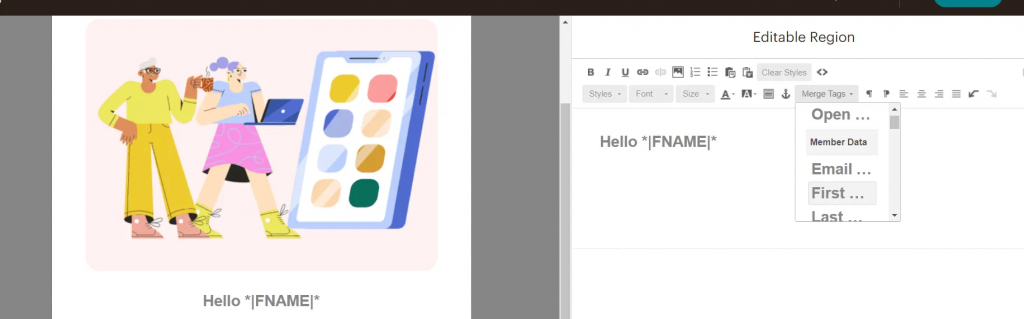
- Insert Merge Tags: In the campaign editor, place your cursor where you want the merge tag to appear. You can either type merge tags directly into your email content or choose them from the Merge Tags drop-down menu. You can customize merge tags and define default values. Use the first name tag (|FNAME|), click the “Merge” tab and select the desired tag.
Typing Merge Tags Manually: When typing a merge tag directly, ensure it is enclosed within asterisks (*) and pipes (|). Avoid typos, as errors can cause the tag to display incorrectly, leading to a poor user experience. For instance, an email starting with “Hello, |FNAME|” would appear unprofessional if the tag fails to resolve.
Using the Merge Tag Toolbar: To prevent syntax or typing errors, it’s recommended to add merge tags via the Merge Tags menu. Simply click the Merge Tags drop-down in the editor toolbar and select the required tag.
The screenshot below shows an example from a custom-coded email template editor.
Send a test email to verify that your email content is displaying correctly.
Speaking of testing, how can you test merge tags in Mailchimp? Let’s learn that in our next section.

How to Test Merge Tags in Mailchimp
Mailchimp has provided us a way to test merge tags. Here are the details of the process.
- Since merge tags won’t populate in a test email, there is no point in sending one for that. Instead, use Preview mode and toggle on the “Enable live merge tag info” option, and then send a live email to your team.
- For testing merge tags on signup forms and response emails, fill up the form, and when you receive the email, check if the merge tags are working properly.
Bear these points in mind while testing Mailchimp merge tags:
- Check Merge Tag Syntax: Ensure that the merge tags are correctly formatted, with each tag enclosed between an asterisk (*) and a pipe (|). Tags will not render if the syntax is incorrect.
- Verify Case Sensitivity: Merge tags must be written in uppercase letters, as they are case-sensitive. Avoid using lowercase letters to prevent errors. For greater accuracy, it’s best to select merge tags from the Merge Tags menu to minimize human error.
- Review Formatting: Merge tags are style-sensitive; therefore, double-check for unintended formatting, such as italics, bold text, or other errors, that could affect their appearance.
- Send or Schedule: Once you’ve inserted and customized all necessary merge tags, tested their functionality thoroughly, and verified their formatting, send your email or schedule it for a future date.
For more information, consult Mailchimp’s dedicated resource.
Conditional Merge Tags in Mailchimp
The secret to dynamic, personalized emails is the conditional merge tag. In Mailchimp, conditional merge tags help you determine “who sees what” in their emails. You set conditions for each subscriber according to which your emails show/hide certain content.
As an example, Mailchimp illustrates how a wine brand would employ conditional merge tags in their promotional email so that the latter’s content will not be visible to recipients below 21 years of age, in the following way:
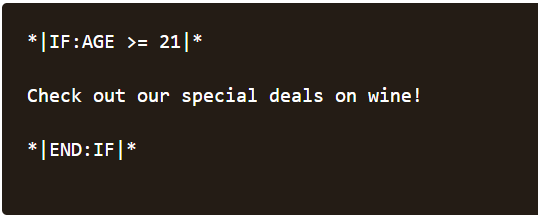
Not to quibble, but Mailchimp’s illustration is faulty in that there should be no subscriber below age 21 on the contact list of a wine brand in the first place, so the question of using conditional merge tags with respect to age does not arise. But you get the point: Conditional merge tags help you achieve dynamic personalization. Feel free to consult Mailchimp’s guide on this. The rest of the scenarios or examples covered there are bang-on.
Wrapping Up!
Now that you know how to add and test Mailchimp merge tags, you should be good to go. Keep the best practices and potential misapplications in mind, and your email marketing in Mailchimp is sorted. For more info on all things Mailchimp, visit the blog.
Susmit Panda
Latest posts by Susmit Panda (see all)
Email Unsubscribe Message: Exploring its Nitty Gritties with Examples
A Call to Action: Email CTA Best Practices, Examples (30+), & More