
Email is an immensely powerful platform. It offers a stellar ROI, the ability to build unwavering customer relationships and a unique brand identity, gives you complete control over your contact list, and above all, is extremely user-friendly. However, all this is of no use unless your business has the right personnel and tools. And speaking of tools, few are as adept at helping you reap the benefits of email marketing as Klaviyo.
Klaviyo doesn’t need any introduction, particularly within the email marketing community. From allowing brands to craft highly personalized campaigns to thoroughly analyzing their performance, Klaviyo is a one-stop shop for several email marketers out there. The platform is known for introducing innovative and elegant updates to its sophisticated suite of features, which further endears it to its loyal user base.
In this blog post, we are going to present a lowdown on one such update – Klaviyo’s new email template editor. We will navigate its ins and outs so that you can use it to create pixel-perfect campaigns, all in a few clicks! Let’s get started then, shall we?
Differences Between The Classic And New Template Editor
Klaviyo now has the New Template Editor as well as the Classic Editor. With two options at your disposal now, it is important to address the differences between them. This will help you to select the appropriate route as per your requirements.
The table below highlights some major distinctions.
| Classic Editor | New Editor | |
| Adding columns to your email | Click “Blocks” and then drag the “Add Columns to Email” option to your template.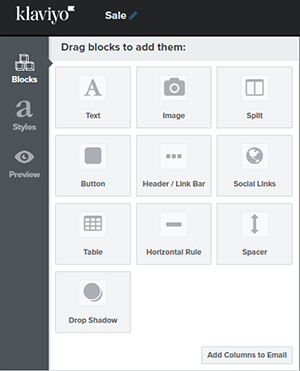 | Click “Content”. Under the section named “Layout”, you’ll see an option named “Columns”. Drag it to your email template.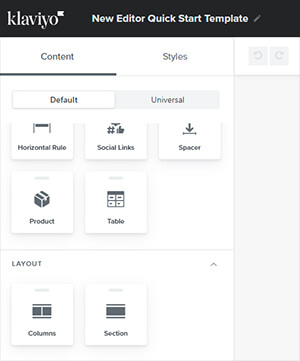 |
| Using Table Blocks | You have three tabs in the Table Block section- Columns, Rows, and Advanced. Using the Columns tab, you can label, add, and remove columns. The Rows tab lets you add content to the table. Over here, you can also convert a table from static to dynamic. | Here, the Table section also has three tabs. But, they differ from the ones offered in the Classic template- Content, Table Settings, Display Options.The Content tab, as the name suggests, allows you to add content to the table. To do so, you have to click on the desired cell. Under the Table Settings tab, you get options to set your table to appear either static or dynamic. Additionally, you can modify the number of rows or columns here. Using the Display Options tab, you can control when your table appears- on desktop, on mobile, or on both desktop and mobile. |
| Saving Blocks | You can save a block by hovering your cursor over it, and then clicking the star icon from the pop-up. You’ll notice that the Blocks pane will have a new option in it titled “Saved”. To add this saved block to a template, you just have to perform a simple drag-and-drop exercise. | The method to save blocks in the New template editor is the same as that in Classic. Once saved, you’ll be able to access it by clicking the “Saved” tab under the Content section. |
| Controlling Stack on Mobile | -Select the concerned message. -Go to the Styles tab. -Navigate to the “Mobile” section. -Click the drop-down box named “Enable Optimizations”. -Choose “Yes”. | If you want the columns of a particular section to stack on mobile, visit the concerned section’s “Styles” tab and enable the “Stack on mobile” option. Further, select if you want the stacking to happen from left to right or the other way round. |
| Adding personalization | -Select the concerned text segment. -Click the “Insert Property” option. -From the drop-down menu, select a property of your choice. -If you want to add preference page and unsubscribe tags, you need to click the “Insert Tag” option. | -Select the concerned text segment. -Click the person icon. -From the pop-up menu, select a property or tag (or both) of your choice. |
New Template Editor Features
Listed below are the features which are exclusive to Klaviyo’s new template editor.
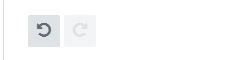
- Undo/Redo buttons- Allows you to rectify mistakes while designing your template. This is how they look:
- Autosave- Changes made to the email template are automatically saved post certain actions.
- Improved preview experience- The new template editor lets you preview your template using different event data or profiles. This makes validating dynamic content and sending tests very easy.
- Easier editing- In the new template editor, you have the choice of grouping multiple blocks into a section.
- Custom fonts- Add a custom font of your choice with a few clicks. What’s more, the custom font you add to the template becomes available in the signup form editor, besides all the new editor font drop-down menus.
- Sections- Every single part of your email template (hero section, footer, CTA, etc.) has a designated section. As a result, organizing content is quite effortless.
- Background images- To overlay text on an image in the classic editor, one has to custom-code a block. In the new template editor, however, they can achieve it by simply adding a background image to the section in question.
- Universal content: Saving a section or block as universal content enables you to perform edits across all instances of the saved content in one go.
- Content repeat- With the help of this feature, you can repeat the content of a particular section or block for each entry in a list of data.

Designing An Email Template In Klaviyo’s In-built Editor
Let us take a closer look at the different features available in Klaviyo’s new email template editor.
Content
In the sidebar that’s present in the new template editor windows, you’ll notice two broad tabs- Content and Styles.

Under Content, you get to choose between Default and Universal.

The default section is further divided into two segments – Blocks and Layout – to let you build your template from the ground up. While blocks are used to add content, images, CTA buttons, social links and other elements to the email template, layouts are used to arrange and configure the blocks.
All blocks and sections can be saved, cloned, or deleted. To move any block or section within your template, all you have to do is click and drag it.
The universal section lets you access content which you have designed in other templates and saved for later use.
Under Blocks, you will have the following options at your disposal to create your template.
- Text: Used to add text to your template. To modify said text’s style settings, navigate to the “Styles” tab (discussed in detail below).
- Image: Used to add pictures to the email template. There are various ways you can go about it- upload an image from your device, use an image’s URL to import it or insert an image that you have already added in the past.
- Split: With the help of this feature, one can display their content in two columns.
- Button: Used to add CTAs to the template.
- Header/Link Bar: Use this feature to add your brand logo and other navigation links at the top of your email.
- Drop Shadow: A visual effect, which lets you emphasize a specific area of your template.
- Horizontal Rule: Used to draw a line of demarcation between the different content blocks in your template. This line can be solid, dotted, or dashed.
- Social Link: This feature lets you add icons that link to your social media handles.
- Spacer: Allows you to add spacing (customizable) between vertically stacked blocks.
- Product: Used to add products from your store to your email. You will have two options here, Dynamic and Static. If you choose dynamic, products will get selected automatically from your website depending on what’s popular and what visitors are frequently browsing or purchasing. Selecting static, on the other hand, enables you to manually pick the products you wish to list in your email.
- Table: Lets you organize text and images within your template. There are no limitations regarding the number of rows or columns you can add.
Styles
The Styles tab offers a bevy of styling options that you can implement in your email template. Essentially, this is where you define your email’s look and feel. Some things that you can achieve over here have been mentioned below:
- Apply a background color to your email template.
- Set a background image, if you want to.
- Specify different background colors for different content sections in your template. These colors need not be the same as your template’s overall background color.
- Define the width of your email content.
- Add spacing, padding, border, and corner radius (round the edges of your template).
- Apply different text styles to both headings as well as body copy.
- Select fonts of your choice and tune their attributes (font size, weight, spacing, and color) accordingly.
- Add horizontal spacing between each letter and vertical spacing between lines of text.
- Align your text left, right, or center as per your requirements.
- Optimize your email template for mobile devices.
Preview And Test
Once you are happy with the content and appearance of your email template, you can use the “Preview and test” button to check how it will look in your recipient’s inbox.
Based on the message type you’re sending, there are broadly two ways in which you can preview your email.
1. Click on “Preview data source” and select “Event”. Next, choose the event that will trigger the flow. This practice is best for scenarios where you are using a metric-triggered flow.
2. Click “Search for a profile” and choose the one you like. This could either be someone who’s part of the list, or someone who could qualify for the same. This works best for scenarios involving campaigns, list-triggered flows, date-triggered flows, price drop flows, and segment-triggered flows.
Best Practices To Keep In Mind While Working In Klaviyo’s In-built Editor
- It is best to use one section block while adding content. Including multiple section blocks will just unnecessarily increase the file size, and, subsequently, the email loading time.
- Try to use media queries for mobile view optimization when you can. Alternatively, you can also use the show and hide technique. However, this will increase the file size, for it requires twice as much code compared to media queries.
- Keep in mind that custom CSS doesn’t work in the Klaviyo in-built editor. So, the best course of action is to use the HTML <style> tag. Using it, you can add CSS, such as media queries, defining class, and IDs. It should be placed at the top of the email, such as the first instance of the hero/banner. Adding one style tag is sufficient because it reflects across the entire email. Avoid duplicating style tags with the same CSS information.
- While building a template in the new editor, try to refresh the email builder page at regular intervals.
- Exact spacing between two- and three-column sections is not possible in the in-built editor. The best workaround is to use split blocks while dealing with two-column sections, and columns block for three-column sections.
- If you don’t need the columns to be responsive for mobile, you can use the table block or code your own table inside a text block.
- Should your email template have a lot of elements like several high-resolution images and plenty of text, you might enable scrolling in the mobile view. While the extent of the scroll can be minimized, note that it can’t be eliminated altogether.
- While setting up the mobile layout, consider using the show and hide technique.
- Even if you abide by the best coding practices, getting your responsive layout to behave perfectly might prove challenging. You can use a style tag to create a custom CSS viewport for mobile and desktop views, if absolutely necessary. We commonly use these viewports for mobile if we want to make the email pixel-perfect:
<style rel=”stylesheet” type=”text/css”>@media only screen and (max-width:600px) { X } </style>
or
<style rel=”stylesheet” type=”text/css”>@media only screen and (max-width:480px) X } </style>
To properly preview the email, you must click the “Preview and test” button on the top right corner.
- You will only be able to add the font family that is supported in Klaviyo’s inbuilt editor. Text blocks allow the use of email font TT Norms.
Wrapping Up!
Wrapping your head around Klaviyo’s comprehensive new in-built editor might take some time, but once you get the lay of the land, you’ll be absolutely unstoppable. We hope the insights shared above are able to enhance your learning journey.
Rohan Kar
Rohan Kar works as a Content Writer at Email Uplers, An engineering graduate, he was quick to realize that his calling lied in other pastures. When not writing, he can be found participating in elaborate movie marathons or aggressive book circle discussions.
Anand Gohel
Anand is the Email Development Team Lead at Uplers and has an extensive experience of 8 years in email development. He loves to explore the depths of ESPs, tools, and the latest technologies. A die-hard Marvel movies fan, he also loves to groove to beautiful music tracks.
A Comprehensive Guide to Email Tracking in Salesforce Marketing Cloud
5 Best Practices to Create Exceptional Email Newsletters with Salesforce Marketing Cloud