
So suppose you own a cute little coffee and ice cream cafe down the road, replete with books to enjoy and delicious sponge cake to dig into as your customers indulge in soaking the amiable ambiance and building networks. Sounds awesome? Ok, I just spelled the dream career of a bunch of millennials out there, but in case you are already living the dream, you probably have an email marketing plan in place not just to attract new customers but also to retain the regular ones.
If you use Mailchimp to automate your marketing paths and plans, you probably might have chanced upon its customer journey feature and mulled over creating one for automating your marketing workflows. It’s a great thought, we say, and one you should consider implementing as soon as possible.
In the blog that follows, we will walk you through the basics of customer journeys, building Mailchimp customer journey maps, setting rules and actions based on buyer personas to offer a personalized and guided journey down the sales funnel, and finally, some use cases.
On that note, kick back on your favorite beanie, plug in your earbuds, open your Mailchimp account in another tab, and get ready to take some mindblowing marketing automation notes. But first, some coffee!

Understanding the basics of the Mailchimp customer journey, definitions associated with it, and the advantages of building customer journey maps
When you look at the words customer journey, one would probably conjure up an image of a person looking for a particular product or service either on the internet or through advocacy from friends and family, carrying out research, chancing upon your brand (if it offers relevant solutions), liking your content, engaging with it and try making a purchase, and if they like the whole customer experience, sticking around for longer.
If that’s what you thought, too, congratulations, your basics are pretty sorted and solid!
If, in one line, I had to explain the essence of customer journeys, I’d say something to the following effect. The actions your customers take either before or after purchasing your product or service come under the purview of the customer’s unique journey with your brand
When you analyze your prospective customer’s interactions with your brand at different touchpoints, you gain a deeper understanding of what works with them and what ticks them off.
As you delve into their patterns of interactions, you are better placed to map out customer journeys, touchpoints, rules, and actions in accordance with their unique needs and buyer personas. So to say, beginning with their initial discovery of your brand until the part where they become loyal customers and advocates of your merchandise.
Mailchimp Customer Journey Builder allows you to create editable, automated marketing campaigns for all your contacts, personalized, if we may add, so that you don’t end up showing strawberry double sundaes to someone who loves chocolate ice cream!
With an option to add tags, setup multiple starting points, send targetted emails, and create unique and relevant branches and actions so that you end up rendering a pleasant and personalized experience for all your contacts, Mailchimp’s Customer Journey Builder helps you realize 4X more orders and ultimately enhanced ROIs, customer retention.
However, you might have limited access to Customer Journey Tools in Mailchimp, so it is recommended that you kindly check your current pricing plan. If you’d like to step up your plan, you can always do that on the plans page on your Mailchimp account.
Please note that the starting points in your customer journey map only kick into action once you activate the particular journey map in your customer journey builder. Here are some simple explanations of the terminology you will encounter as we proceed toward the process of building customer journey maps in Mailchimp.
- Customer journey: Though we have already clarified the concept in the preceding content, here’s a refresher. It refers to an automated route that is unique to each contact depending on what they do or don’t do as they interact with your brand at different touchpoints.
- Customer journey map: This refers to a visual representation of the entirety of probable paths a contact may embark upon in their journey.
- Starting point: As the name suggests, it refers to a pre-determined action or event that marks the beginning of a customer’s journey with the brand.
- Journey point: This refers to the actions or rules that you will set up on your journey map following the starting point, depending on the guided interactions you’d like your customers to embark on as they engage with your brand.
- Rule: A definition describing when and how a contact proceeds along a set path.
- Action: True to its name, an action refers to a specific point in the map that tells Mailchimp’s system to initiate a specific task, for instance, add a tag or shoot an email when the contact reaches that point in their journey.
Phew! Too much to absorb? Well, not really; once we elucidate the process of creating customer journey maps in the following sections, it would probably make a lot more sense!
Before we embark on the same, let’s familiarize ourselves with the phases of a customer journey and the benefits of mapping the same.

Phases of a customer journey
So, a customer’s journey generally passes through the following stages before they become regulars at your store,
- Awareness, wherein they discover your brand and its offerings
- Acquisition, when they liked your content and merch, signed up for a newsletter, and made their first purchase
- Onboarding, here you make them feel welcome with a nice and warm welcome and a general intimation regarding your emailer frequency, set content preferences, and showcase other products that might interest them
- Engagement: This refers to the art of creating awesome content in the form of emailers, social media posts, or newsletters that are informative, engaging, and adds value to your consumers’ lives
- Advocacy: If your customers reach this part of the marketing funnel, you should pat yourself on the back! They will now advocate your brand’s awesomeness to their nears and dears, and before you know it, you will not just have regulars coming back for more but also brand new joiners on the bandwagon!
Advantages of building a well-thought-out customer journey map
- You can delve deeper into the consumer psychology
- Identify and demarcate touchpoints
- Give your marketing efforts the boost they need and deserve
- Enhance customer experience
- Get a clear understanding of how a particular customer might interact with the brand
- Enhance customer engagement and loyalty
How to create a Customer Journey in Mailchimp
One can create and manage Customer Journey maps right from the Customer Journeys homepage. There is an option to choose from a variety of pre-built maps or create a new journey from the beginning. In this section, we will explore the latter pathway.
Step 1: Click on the Automations icon and then select Overview
Step 2: Select the Create Journey option
Step 3: Enter your preferred Name for the journey and then proceed to choose an Audience by clicking on the drop-down menu
Step 4: Hit the Start Building Button
Now that you are all set with creating a new journey, you can now begin adding starting points, rules, and actions that will guide each contact’s path along the map.
Step 5: Adding a Starting Point
- Click on Choose a Starting Point
- You can go with the one that appeals best to your brand
- To know more about all the different starting points in Mailchimp, click here
- You can also set up specific settings for your starting point type. For instance, if you choose to go with Sign Ups as a starting point, you might want to add imported contacts
- You can also increase the level of segmentation by clicking on “Get more specific about who can enter this map”
- Once you are done with setting up your starting point, click on Save Starting Point
- If you have a Standard MailChimp plan, you can add up to three starting points by clicking on the Add Starting Point button
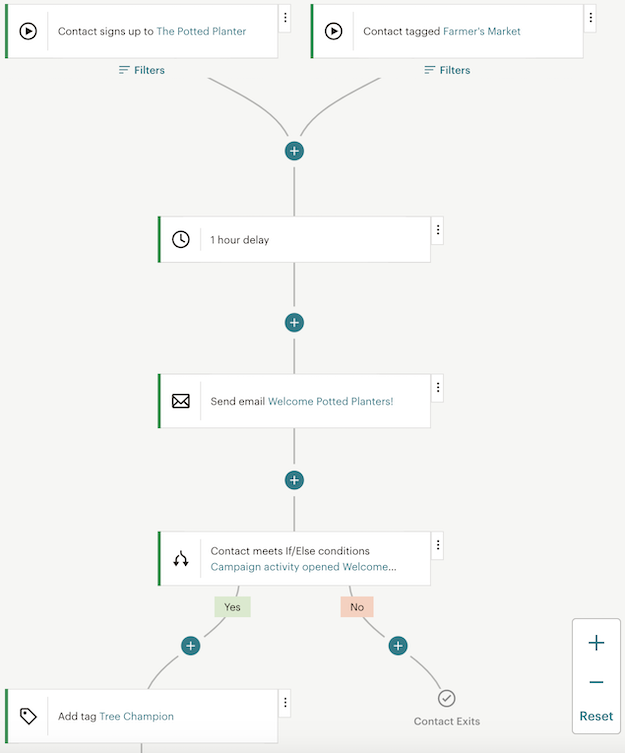
Step 6: Add Journey Points
Once you are done with adding starting points, you can proceed with adding the specific rules and actions that make up a user’s journey, also referred to as journey points.
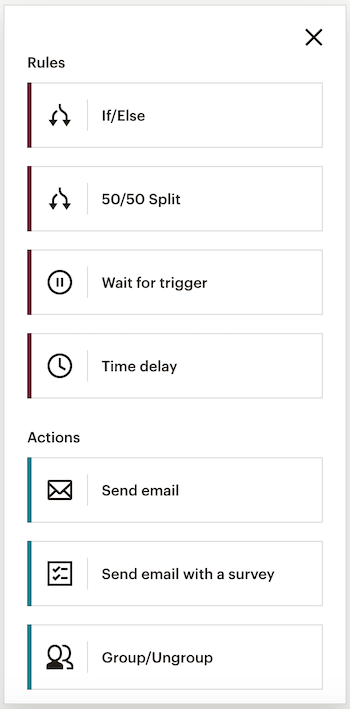
Some instances of journey points are:
- If/Else
- Wait for trigger
- Time Delay
- Percentage split
- Send email
- Send an email with a survey
- Group/Ungroup
- Webhook
- Tag/Untag
- Unsubscribe
- Archive Contact
- Update Contact
Where you spot the Plus Icon +, hover your cursor over it to add another branch to your journey, then click on Add a Journey Point.
Step 7: Activate your Customer Journey
When your customer journey map is ready, click on Continue. If you are adding a marketing objective instead, you need to click on Turn On to immediately activate your customer journey.
Voila! You are done with building your first customer journey!
Contacts will now begin moving along their unique journey as soon as the starting point condition is met.
You can also view stats and edit the journey points as and when the need arises.
Use Cases of Automated Journey Maps
Depending on the type of business you own and run, your use cases of automated workflows will vary. Here are a few common scenarios wherein you can tap into the potential of creating automated workflows to realize better customer relationships, enhanced trust, and experiences.
- Welcome new customers and introduce them to your brand
- Bring back prospective shoppers to their abandoned carts
- Customer re-engagement
- Get reviews or feedback on your service/product
- Better segmentation by organizing contacts on the basis of their interests and levels of engagement
Summary
On a conclusive note, it is safe to say that building automated customer journey workflows not only ensures effective communication but also helps improve conversions. If you seek professional help in setting up customer journeys in Mailchimp for your business to realize better ROIs, then team awesome @Email Uplers is all game! Hit us up now!
Naina Sandhir
Latest posts by Naina Sandhir (see all)
Pocket Guide to Salesforce Einstein GPT: Everything You Wanted To Know About The World’s First Generative AI for CRM
The Email Marketers Guide To Optimize Images For Enhanced Dark Mode Viewing Experience